Tag Archives: chicken

Colorful Chicken Veggie Stir-Fry

Gluten-free | Dairy-free | Egg-free | Nut-free | Clean eating option | Soy-free option

IMG_2634

This is a great, easy, adaptable weeknight option for getting lots of protein and colorful veggies with minimal effort! Just include whatever veggies your family likes (or at least will tolerate) and watch them scarf it down!

Colorful Chicken Veggie Stir-Fry

Original recipe here

  • 1 lb chicken breasts, cut into bite-sized pieces
  • 1/4 cup gluten-free tamari sauce (or soy sauce)*
  • 1 Tbsp rice vinegar (apple cider vinegar works great too)
  • 1 tsp sesame oil (optional)
  • 2 cloves garlic, minced
  • 1/4 tsp ground ginger
  • up to 1/4 tsp red pepper flakes
  • 3/4 cup low-sodium chicken broth (gluten-free)
  • 2 tsp corn starch
  • 1 Tbsp grapeseed oil (or other high-heat oil like canola), divided
  • up to 6 cups assorted veggies (I used halved baby carrots, diced red pepper, frozen broccoli florets, frozen peas, and frozen corn–just use what you have on hand. Other suggestions: zucchini, squash, red onion, edamame, etc.)
  • cooked rice, for serving (use brown rice for clean eating)

*For soy-free, try coconut aminos

  1. Combine tamari sauce, vinegar, sesame oil (if using), garlic, ginger, and red pepper flakes in a medium bowl, then add chicken and toss to coat.
  2. Marinate 10 minutes in the refrigerator, then drain, reserving marinade in a measuring cup. Add chicken broth, then whisk in corn starch until smooth.
  3. Heat 1 tsp oil in a large wok or nonstick skillet over medium-high heat. Add chicken. Stir-fry until cooked through. Set aside.
  4. Increase heat to high and add remaining 2 tsp oil to wok. Add veggies in order of how long they take to cook: carrots obviously are first, then broccoli, then smaller veggies. Remember frozen veggies take less time to cook. Stir-fry until crisp-tender; do not overcook, as they’ll continue to soften when you add the sauce.
  5. Add chicken and sauce, then stir-fry until sauce has begun to thicken, 2-3 minutes.
  6. Serve over cooked rice.

1 Comment

Filed under Recipes

Going Gluten-Free: Super-Easy One-Skillet Chicken with Cilantro-Lime Black Bean Rice.

Gluten-free | Dairy-free | Soy-free | Nut-free | Egg-free

IMG_2648

My middle daughter (the strawberry gelato aficionado from my last post) was recently diagnosed celiac just before her 5th birthday. Over the past couple of months, I’d noticed some changes in her that worried me: she was sleeping later than either of her sisters, but was still tired all the time, wearing out much more quickly than usual. She complained often of belly pain and growing pains, she had circles under her eyes, would often get unexplained low-grade fevers, and she was much more easily irritated. So I called our pediatrician’s nurse line and expressed my concerns, asking if we could get some blood work done before her 5-year checkup. The doctor wanted to see her right away after hearing the symptoms I was describing, and ran a full panel for everything from mono to anemia, diabetes to liver dysfunction, cancer to celiac. Her celiac numbers were astounding, and we were referred to a GI specialist right away. At that visit, she weighed in at 34 pounds. 5 days before her 5th birthday. Being in the 90th percentile for height. Her dot was 2 full inches BELOW the BMI curve. I knew something wasn’t right, but I wasn’t prepared for that shock.

As you know from my MSPI posts, we’re no strangers to accommodating dietary changes, but as hard as it was do avoid dairy and soy, I knew that it was temporary; I only had to cut them out for 6 months until my baby’s stomach was strong enough to get it through my milk, and my now-almost-3-year-old grew out of it at 18 months. Being told that celiac was a change for life–and an autoimmune disease, no less–and that she was so malnourished as a result of the malabsorption that we were one step away from a feeding tube, was a LOT to take in. (Keep in mind we’re also expecting baby #4 in 2 months, are getting a house ready to sell, and are building a house.)

But my pity party is over (for the time being) and now I’m setting to work researching recipes and finding gluten-free snacks that my pickiest eater (of course it WOULD be my pickiest eater) will eat so that she can catch up to her growth curve.

I’ve had some success adapting some of her favorites of my old standbys (I’ll do a separate post about those), but while I have the time before Baby comes, I’m trying to expand my repertoire of naturally gluten-free meals that are easy and don’t require the separate pots and pans needed to prevent cross-contamination (I told you it’s a lot to take in).

If you’ve been around for awhile, you already know what big fans we are of the many variations of chicken-and-rice dishes, but one of the challenges of gluten-free eating is finding ways to keep the fiber content up when we’re so used to eating whole-wheat almost everything. So I love that this easy one-skillet meal mixes the beans right in with no effort!

One-Skillet Chicken with Cilantro-Lime Black Bean Rice

Adapted from here

  • 1 Tbsp olive oil
  • 4 boneless skinless chicken breasts (or use skin-on thighs like in the original recipe)
  • salt and pepper
  • 2 cups low-sodium chicken broth (make sure it says “gluten-free”)
  • 1/2 cup water
  • 1/4 tsp salt
  • 1/2 tsp cumin
  • 4 cloves garlic, minced
  • 1 cup jasmine rice
  • 1-2 Tbsp (I used 1 1/2) fresh-squeezed lime juice (can be bottled; I add a drop of Lime essential oil to mask the bottled taste)
  • 1 1/2 Tbsp dried cilantro (or 1/4 cup fresh chopped)
  • 1 can black beans, rinsed and drained
  1. Heat a wide, deep skillet with lid on medium-high and add the olive oil. Swirl to coat the bottom of the pan. Season both sides of the chicken with salt and pepper, then lay them face down in the pan and brown 4 minutes–careful not to burn.
  2. Turn chicken breasts and brown on medium heat 2 more minutes. Remove to a plate (they won’t be done through yet).
  3. To the same skillet, add chicken broth, water, salt, cumin, garlic, and rice. Stir to incorporate and bring to a boil. Place chicken on top, making wells in the rice for each chicken breast, reduce heat to a simmer, cover, and cook 15 minutes or until rice is tender, moisture is absorbed, and chicken is done through.
  4. Remove chicken to a plate and add lime juice (start with 1 Tbsp), cilantro, and black beans. Taste and adjust amount of lime juice. Then place chicken breasts on top to serve.

2 Comments

Filed under Recipes

Clean Crock Pot Chicken Cacciatore.

Dairy-free | Soy-free | Nut-free | Gluten-free option | Clean eating

IMG_2223

Fresh, light, kid-approved, and ready straight from the Crock Pot at dinner time–my kind of recipe for a busy ballet evening! This recipe uses components of a couple different ones: a friend’s and one that I found online that used fire-roasted tomatoes, which I’ve fallen in love with since discovering the Beef Curry recipe that inspired mine on here.

One of my favorite things about this is that I can just throw frozen chicken breasts in here if I’m short on time! They don’t turn out quite as fall-apart tender as fresh ones, but no one else has been able to tell the difference, and the time saver is worth it to me!

Clean Crock Pot Chicken Cacciatore

Adapted from here and a friend’s recipe

  • 28 oz. canned diced fire roasted tomatoes
  • 4 chicken breasts (frozen if needed)
  • 1 yellow onion, large dice
  • 1 red bell pepper, large dice
  • 2-3 cloves garlic, minced or finely chopped
  • up to 1/2 tsp black pepper
  • 1/2 tsp salt
  • 1-2 Tbsp balsamic vinegar
  • 3 oz (6 Tbsp or half of a 6-oz. can) tomato paste, in approx. Tbsp-sized dollops
  • 1 tsp dried oregano
  • up to 1/4 tsp red pepper flakes
  • 1/4 cup chopped fresh basil
  1. Spread 1/2 cup of the canned tomatoes in the bottom of your slow cooker.
  2. Layer remaining ingredients on top, in order listed (remaining canned tomatoes come after garlic).
  3. Cover and cook on low 6-7 hours.
  4. Before serving, prepare pasta of choice (we use whole-wheat short pasta) according to package directions.
  5. Just before serving, gently stir cacciatore, then spoon on top of pasta. Top with parmesan cheese, if desired.

Leave a comment

Filed under Recipes

Last-minute dinner solutions.

You guys, this pregnancy has been kicking my butt: something to do with it being my first time being pregnant in my 30s, combined with having to keep 3 kids alive–including a 2-year-old part-tornado, part-monkey, part-evil genius. At 23 weeks–the usually FUN! trimester–I’m already acutely feeling every single third-trimester ache and pain, and I’m spending most afternoons on the couch. Definitely not the speed I’m used to.

So dinner time has been interesting!

Most of the time, eating out actually makes me feel worse, so what’s a mom who’s solo for dinner time going to do? Simplify. Which, honestly, means a lot of pasta. My girls are kind of sick of pasta. But it’s easy, it’s versatile, and aside from the overuse it generally doesn’t elicit complaints from the under-5′ set. (I still can’t believe that my 7-year-old is already over 4 feet tall.) And I’m really not operating on enough cylinders to think far enough ahead to do the Crock Pot thing.

Rather than blog each recipe individually (I’m tired, remember? And my back is already hurting just sitting typing this… How many weeks do I have left?), I’m just going to make a roundup of the last-minute dinner saviors I’ve been using lately. Some are from my blog, and some are from others; all photos are property of their original publishers.

Peas and Pasta, from Weelicious

Meatless | Clean eating | Soy-free | Gluten-free option | Nut-free

peas-pasta

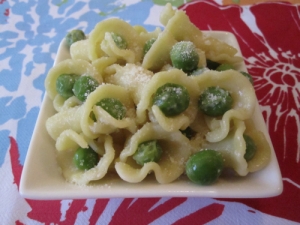
This has been a last-minute staple in our family for years. It is SO easy, SO fast, and uses ingredients I always have on hand, so when it’s 4:40 and I haven’t even thought of dinner, this is it. I use whole-wheat pasta to keep it clean and up the protein and fiber to make it more filling; you can use gluten-free pasta if needed. Also, because this is a very mild dish, easy on the seasonings and spices, it’s usually one of the first recipes I attempt when I’m coming out of morningsickness, and it’s a good one when a bout of nausea blindsides me again.

Creamy Garlic Alfredo, from Mel’s Kitchen Cafe:

Meatless | Mostly Clean eating | Soy-free | Gluten-free option | Nut-free

alfredo1-jpg

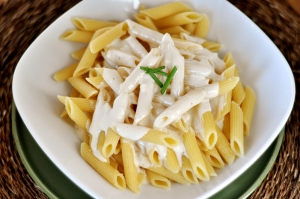
Again, super easy, super fast, and uses things I already have in my fridge. The only forethought required is softening the cream cheese a bit, though in a pinch I’ve just thrown it in cold. Again, I use whole-wheat pasta, but gluten-free would work.

Southwest Chicken Wraps:

Nut-free| Gluten-free option | Soy-free option | Clean-eating option

dsc_0260

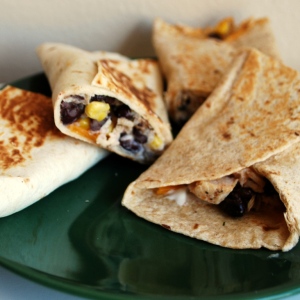
For a break from pasta, here’s what we had tonight. These are great because I can cobble together leftover bits from other nights when I’m feeling well enough to make more of an effort for dinner (read: weekends, when my husband’s able to be home to wrangle girls) to make a hearty meal with very little effort. I always cook up extra rice and extra chicken to keep in the fridge, and the rest comes together quick. The best part is that I can stretch the filling recipe over two meals, and freeze half, so that on nights like tonight, all I had to do was pull it out in the afternoon to thaw on the counter, then grab the cheese, sour cream, and tortillas, and in less than 15 minutes dinner’s on.

Vegan Creamy Tomato Basil Pasta:

Dairy-free | Soy-free | Clean eating | Vegan | Gluten-free option

036

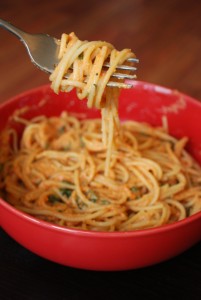
(I really need to update that photo now that I have a Vitamix that actually makes the cashew sauce legitimately creamy.)

Anyway, here’s another really easy pasta option. As long as you’ve got the ingredients on hand, it comes together quick. The sauce literally cooks for maybe 5 minutes. So your dinner is done in the time that it takes to boil some water and cook some pasta. And my girls consistently down this one. I used to dial down the garlic and basil, but I don’t need to anymore.

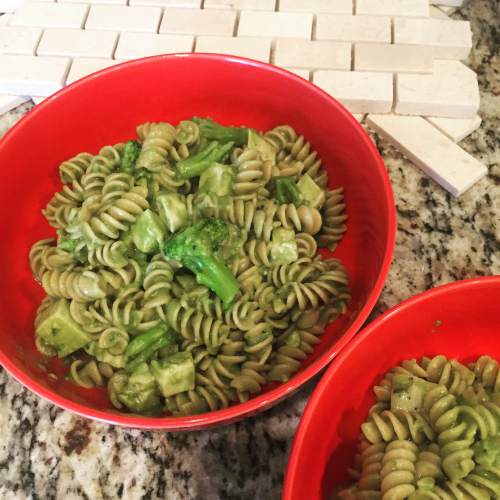
Skinny Chicken Broccoli Alfredo:

Clean eating | Soy-free | Nut-free | Gluten-free option | Meatless option

img_8408

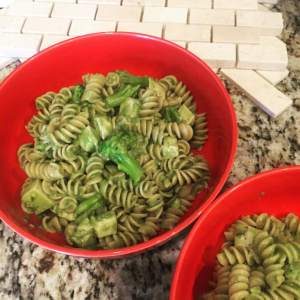
This one is really versatile. Lately I rarely add the step of turning the sauce green; I just leave it white. Sometimes I make it without chicken if I don’t have any cooked chicken on hand. Again, I make a habit of keeping all of the essential ingredients in my kitchen, so that I can make some variation of this protein-filled dish any time. The roux sounds intimidating, but even though there are a few steps to it, the sauce comes together really fast–again, just in the time it takes me to boil a pot of water and cook my pasta.

Creamy Chicken Taquitos:

Soy-free option | Clean eating option | Gluten-free option | Nut-free

006

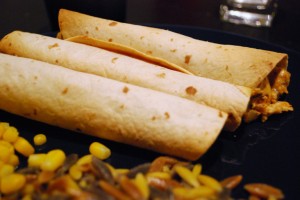
Another non-pasta option! This week I dusted this one off from a long time ago–when I was still firmly in my semi-homemade days. I think this is from when I was pregnant with my second kid. It’s been awhile. I bought a rotisserie chicken from the Costco that just opened a couple miles away (yay!!!!!), chopped it up, and whipped these up. They’re easy to freeze for later, so now I have another dinner waiting for me to just throw in the oven!

If dinner time has become a chore or a panic-inducing time at your house, I hope that some of these ideas help you a little. Even as tired, gross, unmotivated, or sore as I might feel, I’m so grateful that I have so many options in my back pocket to pull out to keep my family–and myself and my growing baby–fed and healthy. Now, I’m not going to lie: the other night we had oatmeal. And we do hit the Chick-fil-A drive-through or order pizza or Thai takeout not infrequently. But I’ve noticed, more acutely this pregnancy than ever, that even though it takes effort I just feel better after a home-cooked meal. Even if it is just pasta with some kind of sauce on it.

I do have a few new recipes to post, hopefully soon. In the meantime, I’m going to spend some more quality gestating time on my couch.

Leave a comment

Filed under Adventures in Mommydom, Recipes

Grilled chicken and green beans.

Dairy-free | Soy-free | Nut-free | Gluten-free | Clean eating | Paleo option

img_1629

Lately I’d been finding myself both in a dinner-making rut, and feeling lazy about our clean eating; I wonder if the two are related!

Then one day I found a new recipe for the most delicious-looking and easy green beans. I’m generally not too good at the vegetable side dish thing, to be honest; I try to incorporate the veggies in the dish itself and serve fresh fruit or salad on the side because I want to do as little extra cooking as possible, especially on a weeknight. But these just looked worth it. So I went looking for a good, and easy, chicken recipe to complement it. And I was blown away by the flavor! Usually you need to marinate a chicken breast for hours to get this kind of flavor and tenderness, but here you just brush on a spice rub that took literally 2 minutes to combine! Suffice it to say, this has become one of my favorite weeknight meals. I serve it with brown rice to bulk up the meal, but you can easily omit that, especially if you’re trying to eat paleo or low-carb. I start the green beans first, and as long as the chicken breasts aren’t too thick (tonight mine were), everything finishes at once.

Honey-Dijon Green Beans

Original recipe here

  •  1 lb green beans, washed and ends trimmed
  • 1-2 Tbsp grapeseed or olive oil
  • 1/2 Tbsp honey
  • 1/2 Tbsp organic Dijon mustard
  • coarse Kosher salt
  • pepper
  1. Preheat oven to 425 degrees and line a rimmed baking sheet with parchment.
  2. In a large glass bowl, whisk together oil, honey, and mustard into an emulsion until very well combined.
  3. Add the green beans and use a rubber spatula to coat them thoroughly and evenly with the mustard mixture.
  4. Spread the beans in a single layer on the baking sheet and season with salt and pepper.
  5. Roast for 7 minutes, then remove and carefully flip the beans. Return to the oven for another 6 minutes or until crisped and glazed. (Aren’t they pretty???)

img_1628

Flavorful Grilled Chicken with Spice Rub

Original recipe here

  • 2-3 chicken breasts, halved (make sure they’re less than 3/4 inch thick or they won’t cook evenly)
  • 1 tsp garlic powder
  • 1 tsp ground cumin
  • 1/2 tsp ground coriander
  • 1/2 tsp paprika
  • 1/2 tsp salt
  • 1/4 tsp black pepper
  • 1-2 Tbsp olive oil
  1. In a small bowl, combine the spices and olive oil.
  2. Preheat your grill or grill pan to medium-high heat.
  3. Brush the spice mixture onto both sides of the chicken using a silicone brush or small spatula.
  4. Grill 4-5 minutes to a side until no longer pink in the middle.
  5. Enjoy with green beans and maybe some brown rice!

2 Comments

Filed under Recipes

Chicken Tikka Masala.

Gluten-free | Soy-free | Nut-free | Clean-eating option

DSC_0284

So I’m realizing that we eat a lot of variations on chicken and rice in our house. We have several curry versions, the NYC street cart version, and a few comfort food versions from my semi-homemade days, just off the top of my head.

This is the I-used-to-live-near-an-awesome-Indian-restaurant-but-I-don’t-anymore-but-I-really-don’t-need-to-leave-the-house-anymore-for-delicious-Indian-takeout version. It’s one of my husband’s favorite meals ever. And my favorite part about it–besides how delicious it is–is that odds are good you have all of the ingredients in your spice cabinet! I can’t believe it’s taken me this long to blog it!

Chicken Tikka Masala

Adapted from here

Marinade:

  • 1 cup plain yogurt (I use lowfat Greek yogurt)
  • 1-2 Tbsp. lemon juice
  • 2 tsp. ground cumin
  • 1 tsp. ground cinnamon
  • up to 1/2 tsp. cayenne pepper
  • 1 1/2 tsp. paprika
  • up to 1 1/2 tsp. black pepper
  • 1 1/2 tsp. ground ginger
  • 1 tsp. salt
  • 3 boneless, skinless chicken breasts, cut into strips

Masala:

  • 1 Tbsp. butter
  • 1 jalapeno pepper, seeded and finely chopped
  • 1 clove garlic, minced
  • 2 tsp. ground cumin
  • 2 tsp. paprika
  • 1/2 tsp. salt
  • 8 oz. can no-salt-added tomato sauce
  • 1 cup cream

Rice:**

  • 3 cups water
  • 1 1/2 cups jasmine rice
  • 3/4 tsp. salt
  • 1 1/2 Tbsp. unsalted butter
  1. For the marinade, combine all ingredients except chicken in a medium bowl. Add chicken and toss until coated. Cover with plastic wrap and refrigerate at least a couple hours (I usually do overnight).
  2. Grill chicken (original way) or cook under a broiler on high on a broiler pan (my lazy easy way). Discard marinade.
  3. Meanwhile, for the masala, melt butter in a large deep skillet over medium heat. Add jalapeno and garlic and saute one minute or until fragrant. Season with spices and salt and stir to toast spices.
  4. Add tomato sauce and cream. Simmer on medium-low until sauce thickens, about 15 minutes, stirring occasionally. Begin cooking rice (below). Add grilled (broiled) chicken and simmer 10 minutes.
  5. Rice: bring water to boil. Add remaining ingredients, cover, and reduce heat. Cook 15 minutes, fluff, and serve topped with tikka masala.

**A couple notes about the rice: first of all, yes, I know that Basmati rice is best suited. However, I find Jasmine more economical and versatile, if less authentic. If you want a clean eating version, use brown rice and cook 45 minutes instead of 15.

2 Comments

Filed under Recipes

Legendary NYC Street-Cart-Style Chicken and Rice–Clean!

Clean | Gluten-free | Soy-free | Nut-free | Dairy-free option

DSC_0273

EDITED 5/31/17 to add weeknight shortcut and include the option of using a combination of chicken breasts and thighs.

Half a decade ago, we lived just outside New York City, which meant we were just minutes from some of the most delicious and diverse food options in the world. When we moved to Tampa, I needed to learn to cook some of our favorites myself, and it wasn’t until just weeks ago that I found this gem. Finally our cravings for street cart chicken with yellow rice and yogurt sauce can be satiated!

Clean NYC Street-Cart-Style Chicken and Yellow Rice

Adapted from here

Chicken:

  • 2 lbs. boneless, skinless chicken thighs (or combo of thighs and breasts)
  • juice of 1 lemon (1/4 cup)
  • 1 tsp. dried oregano
  • 2 tsp. ground coriander
  • 1 1/2 tsp. salt
  • 1/4 tsp. black pepper
  • 4 cloves garlic, minced or pressed
  • 1/4 cup olive oil

Yogurt sauce: (you only need half of what’s below if not everyone loves it with the sauce; omit for dairy-free)

  • 1 cup plain lowfat Greek yogurt
  • 1 tsp. apple cider vinegar
  • juice of 1 lemon (1/4 cup)
  • 1/2 tsp. honey
  • 1/2 tsp. salt

Rice:

  • 2 Tbsp. butter, olive oil, or dairy-free buttery spread
  • 1 1/2 tsp. ground turmeric
  • 1 tsp. ground cumin
  • 1/2 tsp. salt, or to taste
  • 2 cups basmati, jasmine, or brown (for clean) rice
  • 2 cups chicken broth
  • optional: additional water for jasmine or brown rice (see instructions below)
  1. Toss together chicken marinade ingredients with chicken; marinate an hour. Weeknight shortcut: my friend Chrissy found that cutting up the chicken breasts and thighs into 1-2 inch pieces prior to marinating saves a ton of time during both marinating and cooking, so that’s the only way I do it now!
  2. Whisk together yogurt sauce ingredients in a small bowl and refrigerate until ready to use.
  3. Heat a large saucepan on high heat with enough olive oil to lightly coat the bottom. Add chicken pieces and cook in batches until done, making sure you get a good sear. Remove to a plate and keep warm.
  4. If there are burned bits of garlic in the bottom of the pan, remove those. Then in the same pan, add butter, rice, and spices. Stir to coat and cook on medium-high 1-2 minutes to toast the spices.
  5. Add chicken stock, and water if needed. Basmati: no additional water. Jasmine: 1 1/2 cups water. Brown: 2 1/2 cups water.
  6. Bring to a boil, then cover and turn heat down to low. Cook 15 minutes for basmati and jasmine; 45 for brown rice. Fluff when finished and remove from heat.
  7. When rice is done, dice chicken.
  8. Serve chicken atop yellow rice and drizzle with yogurt sauce. Sprinkle with harissa, sriracha, or other hot sauce if desired.

Leave a comment

Filed under Recipes

Creative leftovers: Pressed Southwest Wraps.

Nut-free| Gluten-free option | Soy-free option | Clean-eating option

DSC_0260

Let’s talk leftovers.

My girls don’t like them. Nope, not one bit. Except for my toddler, whom I often hear grunting and “eeeee” (please)-ing as I’m trying to enjoy my leftover curry (or this one!) or chicken tikka masala for lunch in peace.

But who really wants to make a brand-new, from-scratch meal (that their kids are probably going to whine and complain about anyway) every single night?

So I’ve been trying to find ways to cut prep time while masking a few “reused” ingredients. Here are a few:

  • Always make extra. Extra rice, extra cooked and chopped chicken. And keep it in the fridge to use in a different recipe.
  • Always make extra (again). Extra enchilada sauce or enchiladas, extra filling for these wraps. And freeze it for another meal.
  • When I need a small amount of something, like tomato paste or green onions, I portion out the rest and freeze it.

These wraps do a great job of combining these odds and ends into something low-effort and really delicious. The best part is that you can add in whatever you and your family wants. I subbed in corn for the original recipe’s peppers and adjusted the spices a little bit so that my girls will enjoy it without complaining.

With the right tortillas and brown rice you can make this gluten-free and/or clean. Unfortunately, I don’t know if there’s a way to successfully make this dairy-free because the cheese and sour cream help hold the wrap together, but you could try it with vegan cheese and just really sticky rice. Let me know how it works!

Pressed Southwest Wraps

Adapted from here

  • 1 cup cooked warm rice
  • 1 green onion, finely sliced (or 1/2 Tbsp. chopped green onions- still frozen, even!)
  • 1/2 Tbsp. dry cilantro
  • up to 1 tsp. chili powder
  • 1 tsp. ground cumin
  • 1/2 tsp. garlic salt
  • 1 tsp. lime juice
  • 1-2 cups cooked chopped or shredded chicken
  • 1 can black beans, rinsed and drained
  • 1/2 cup frozen corn, defrosted
  • shredded Mexican-blend cheese (I even used crumbled-up leftover cheddar slices once!)
  • sour cream
  • tortillas, gluten-free and/or soy-free if necessary
  • soy-free cooking spray
  1. Combine the rice, onions, spices, and lime juice in a medium bowl. Stir in chicken, beans, and corn.
  2. Dollop a spoonful of sour cream around the center of an open tortilla and sprinkle with cheese. Spoon a couple tablespoonfuls of the filling onto the tortilla, then roll like a burrito. Spray the cooking spray on the seam side and lay seam-side down on a plate.
  3. When all wraps are assembled, heat a nonstick griddle on medium to medium-high heat. Carefully lay a couple wraps at a time on the griddle, seam side down, and press down all over with a spatula. The cooking spray helps seal the seam shut. When browned, flip, press again, and remove to a warm plate until all wraps are finished.
  4. You can wrap each individually in foil to save and reheat in the oven later.

Leave a comment

Filed under Recipes

Skinny Chicken Broccoli Alfredo, turned green for St. Patrick’s Day.

Clean eating | Soy-free | Nut-free | Gluten-free option

IMG_8408

When we visited Rome last year, my friend told us about the original Alfredo’s, where lore has it that the owner created the original Fettucine Alfredo–to satisfy his wife’s pregnancy cravings.

So of course we had to visit. They brought out a huge platter of steaming fettucine piled high with three mounds of cheeses, and proceeded to mix it all together at astonishing speed. Then we ate at astonishing speed–until we felt sick. It sat like a rock in our stomachs. We were very glad that our apartment was only a 10-minute walk away.

This Alfredo-inspired sauce brings back those memories without weighing us down. Instead of 3 piles of cheeses, you get the creaminess with a bit of bite from the Greek yogurt and fresh-grated (or not fresh-grated) Parmesan. Today, for St. Patrick’s Day, I turned the sauce green, and the girls said they liked it even better than usual!

Skinny Chicken Broccoli Alfredo

Original recipe here

  • 2 chicken breasts, seasoned, cooked, and cut into bite-sized pieces
  • 8-10 oz. whole-wheat (or gluten-free) pasta, such as rotini
  • 2 cups frozen broccoli
  • 2 Tbsp. olive oil
  • 2-3 (I use 3) garlic cloves, pressed or minced
  • 2 Tbsp. whole-wheat pastry flour (or gluten-free flour of choice)
  • 1 cup low-sodium chicken broth
  • optional: handful spinach
  • 1/4 cup skim milk
  • 1/4 cup plain Greek yogurt (I use 2%)
  • salt and pepper
  • 3/4 cup fresh-grated Parmesan
  1. Cook pasta as directed, adding frozen broccoli for last 2 minutes of cooking time. Reserve up to 1/2 cup pasta water before draining.
  2. If you’re turning your sauce green: add chicken broth and spinach to your blender and blend until smooth.
  3. Make the roux: Heat oil in a large saucepan on medium heat. Add garlic and stir constantly 1 minute, until fragrant. Sprinkle in flour and whisk to cook for 1 more minute. Slowly whisk in chicken broth, then milk, until bubbling.
  4. Whisk in Greek yogurt, then season generously with salt and pepper. Turn heat down to medium-low and simmer 2-3 minutes, until thickened. (If there is spinach in the sauce, it will take longer and will not thicken as much.)
  5. Remove from heat. Stir in Parmesan until well incorporated, then stir in chicken.
  6. Combine sauce with pasta mixture; add small amounts of pasta water until sauce is your desired consistency.

Leave a comment

Filed under Recipes

Making over Taco Night. Twice.

Clean eating | Dairy-free option | Soy-free option | Gluten-free option | Nut-free

My girls LOVE Taco Night. Something about being in charge of their own meal and what goes in it. Not to mention it’s messy, which makes it fun. But I’m going to be honest: it’s not always been my favorite. First, the taco seasoning packets. Gross, am I right? Have you seen those ingredient labels?! Well, Alton Brown’s taco seasoning takes care of that REALLY quick. And clean too! Make it once and keep it in a small jar or even a little Ziploc bag to use a couple tablespoons at a time.

Second, as a mom, I find that once I’ve assembled everyone’s burritos the way they want them, once I get mine assembled and sit down, the meat is cold. That’s where this new crock pot recipe comes in. It features the same taco seasoning as our usual ground turkey, but the meat stays warm as long as I need it to! Plus more veggies! It came from an unlikely source: one of those easy video recipes you see in your Facebook feed that are usually semi-homemade, from processed ingredients. But with this easy and clean taco seasoning, it’s a cinch to keep the artificial junk out.

Clean Taco Seasoning

Original recipe here

  • up to 2 Tbsp. chili powder, depending on how spicy you want it
  • 1 Tbsp. ground cumin
  • 2 tsp. cornstarch
  • 2 tsp. salt
  • 1 1/2 tsp. paprika (he uses hot smoked, I use Hungarian–both are delicious)
  • 1 tsp. ground coriander
  • up to 1/2 tsp. cayenne pepper, depending on how spicy you want it
  1. Combine all ingredients in a small bowl or jar.
  2. Store in an airtight container (jar or Ziploc bag) for up to 1 month.

Slow Cooker Easy Chicken Fajitas

Adapted from here

  • 1 red bell pepper, sliced
  • 1 yellow bell pepper, sliced
  • 1 green bell pepper, sliced
  • 1 yellow onion, halved and sliced
  • 2 lbs. boneless skinless chicken breasts, halved
  • 2 Tbsp. taco seasoning (see above)
  • 4 cloves garlic, chopped
  • juice of 1 lime
  • 10-oz. can diced tomatoes with green chilies, drained (check the ingredient label on this one; sometimes spices and preservatives are added here)
  • For serving: tortillas (use whole-grain or gluten-free and check ingredient labels for hidden soy and other junk), cheese, sour cream, beans, avocado slices, or anything else that sounds tasty!
  1. Place half of the sliced peppers and onion in the bottom of your slow cooker. Lay the chicken on top, coating on all sides with taco seasoning. Top with garlic, drained tomatoes, lime juice, and remaining peppers and onion.
  2. Cover and cook on HIGH 3-4 hours.
  3. Remove chicken and cut or shred, then return it to the crock pot for 10 more minutes (on LOW) to absorb more of the juices, while you prep your toppings.
  4. Assemble tacos/burritos/fajitas however you want!

1 Comment

Filed under Recipes