Monthly Archives: April 2011

Union Jack shortbread cookies for the Royal Wedding.

I come from a long line of Anglophiles, so it seemed only fitting that I make something to honor today’s royal nuptuals. But I was having the hardest time thinking of a traditional British dessert to make! At the last minute, I was inspired by Hostess with the Mostess’s beautiful royal wedding shoot to make shortbread cookies.

I headed straight to Martha, & found a recipe for Scottie Dog Shortbread Cookies! How oddly apropos! I followed the recipe, except I added a Tbsp. or so of extra confectioner’s sugar at the end because it’s so humid the dough was too sticky, & I felt the dough needed more sweetness. I also didn’t add the cocoa powder. But if you felt like making these, you could make any shortbread cookie recipe you love.

Here’s how to make the Union Jacks:

While the dough is chilling, cut two 2.25-inch by 3.5-inch rectangles out of cardstock or a cereal box or something. Yes, I used a Skinny Cow ice cream bar box, & no, the irony of using that on a recipe with a cup of butter in it is not lost on me. Cut a cross out of one of them with stripes a quarter inch thick.

After chilling, roll the dough out to 1/4 inch thickness (this takes some doing at first) on a lightly floured surface. Use a sharp knife to trace around the rectangle stencil, then use the blunt end of a skewer (I broke mine in half to make it more manageable) to make impressions on either side of the stripes in your cross. Then make diagonal impressions from corner to corner. This is surprisingly slow work, so I would suggest working in small batches to keep the dough from getting too soft. You can see the difference below; the cookies on the left were done right out of the fridge, & the ones on the right were with too-soft dough. You should probably space them wider than I did too; they spread more than I expected in the oven.

Bake at 325 for 13-15 minutes, let cool, & enjoy at your next British-themed tea party! We’re going to eat these with “princess sandwiches” (I have a surprisingly versatile tiara cookie cutter) for lunch today while we watch a rebroadcast of the wedding, just for fun!

(Ok, ok, I went a little overboard with the photos this morning.)

Did you/will you watch the royal wedding? Did you do anything fun for it? Or do you think it’s just silly to care so much about it?

Tidy Mom

1 Comment

Filed under Recipes

Easter leftovers: Spinach Cobb Salad with Honey Mustard Dressing.

If you’re like me, you probably have about 8 lbs. left of your 10-lb. Easter ham & are hoping that it doesn’t go the way of your Christmas ham leftovers, which may or may not have sat forgotten at the back of the fridge for, oh, 2 months or so.

Again, if you’re like me, you had the best intentions of making slow-cooker split pea soup, but waking up to a high in the 80s just didn’t make soup sound that appealing. (Completely forgetting about it until lunchtime may have played a role as well. Maybe.)

Enter the Cobb Salad. Now, there are different types of salad eaters out there. Some like the iceberg, some like more veggies than lettuce, some like ranch, some like vinaigrettes, etc. I, personally, am a lover of fruity spinach salads with sweet dressings. So this is my version. The honey mustard complements the honey ham quite nicely!

For starters, here’s the easy dressing recipe. I found it at AllRecipes.

  • 1/2 cup mayo (yes, this is a lot… feel free to sub lowfat, fat-free, or even Greek yogurt)
  • 2 Tbsp. dijon mustard (I used the cheap stuff, so it was a little on the bitter side; I compensated by adding a little more honey. If you have the good stuff, great. If not, you can always use regular old yellow!)
  • 2 Tbsp. (plus a little if you’re using cheap dijon) honey
  • 1 Tbsp. lemon juice
  1. Whisk ingredients together.
  2. Chill until ready to use.

Easy enough, right?

Now all you need to do is mound some spinach on a plate, top it with some leftover ham, any fruits/veggies of your choice (think avocado, tomato, onion, etc. — I like Craisins), & one of your leftover hard-boiled eggs. Bonus points if it’s still got egg dye on it:

Top with the dressing, & you’re enjoying a perfect 80-degree-day way to use some of your Easter ham (& dyed eggs!).

Here’s what My Husband The Eloquent thought of it: “That was seriously good. & I’m a guy, so I don’t say stuff like that about salad.”

Can’t get any more rave than that!

How are you using your Easter leftovers? I’ve still got about 7 lbs. of ham to go!

works for me wednesday at we are that family

1 Comment

Filed under Holidays, Recipes

Busy Mom’s Strawberry Shortcake.

I hope everyone had a happy Easter!

The Easter Bunny paid us a generous visit:

But man (& Munchkins) can’t live by chocolate & jellybeans alone. However, I really wasn’t interested in spending hours on an Easter menu for just us & some hungry missionaries, so here’s our quick-&-easy Easter menu:

  • A Cook’s brand spiral-sliced ham I got for 79 cents a pound with my ShopRite card, with glaze packet included. (No mixing of honey with anything!)
  • The easiest Funeral Potatoes (the Mormon term for cheesy potatoes — this came about because they’re often served at funerals for the families of the deceased) ever, found here & not even made with the cornflake topping. But still cheesy, melty, comfort food-y!
  • Sliced pineapple — I didn’t even feel like making a salad because I was planning on using all my salad energy on Cobb salad with my leftover ham.
  • Strawberry shortcake


This shortcake recipe comes from my mother-in-law… I don’t think My Husband The Persnickety would ever eat it any other way. It’s easy, delicious, & cheap. Win!

Just make a white cake mix using the whole-egg recipe (2 whole eggs instead of 3 egg whites). I poured mine into a Bundt pan to make it prettier, but you could just do a 9×13 even! Give it ample time to cool, then mash up a 1-lb. container of strawberries with a potato masher & add a little sugar to let it macerate. Then whip up some whipped cream (you know, powdered sugar, vanilla), & put it all together! My Husband The Devourer likes the 9×13 method because you can cut it in half & stack layers upon layers of cake, strawberries, & cream.

Mouthwatering Mondays

Leave a comment

Filed under Holidays, Recipes

Last-minute Earth Day craft.

Happy Earth Day, everyone! Yesterday The Munchkin & I headed to Central Park for a free Earth Day craft sponsored by the Central Park Conservancy, & I thought I’d share it with you, in case you’re like me & don’t really go out of your way to celebrate this holiday but want to do something fun & educational today with your kids.

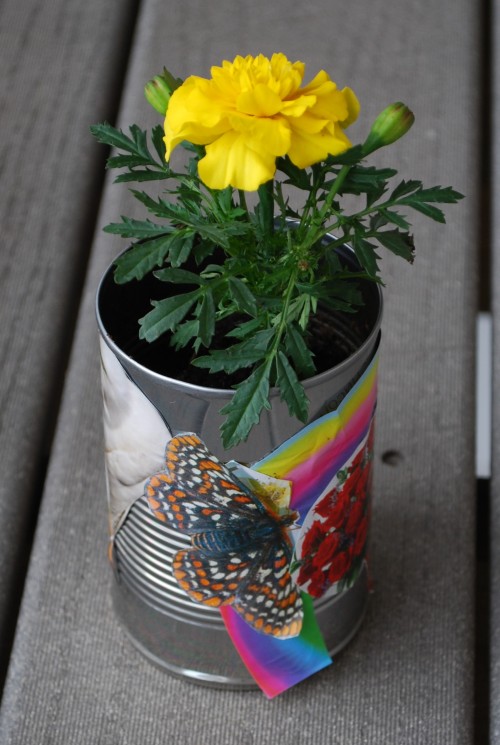
They supplied empty steel cans, magazine cutouts of nature-themed pictures, glue, potting soil, & marigolds. The Munchkin loved choosing her magazine pictures, picking which color flower to plant, & playing with the dirt & water. Once I recovered from the trauma of getting the darn thing home in one piece on the train with Munchkin, stroller, & diaper bag in tow, I liked the lesson that the craft taught: you can reuse just about anything to make our planet a prettier place.

Last month’s Ensign magazine had a great article, entitled “Sowing Seeds of Self-Reliance in Small Spaces,” about creative ways apartment-dwellers like me are growing small gardens. One suggestion was to use old empty containers like soda bottles, kitty litter buckets, & laundry soap containers. Old steel cans work great too!

Here’s how you can do this craft at home:

  1. Wash out an old steel can (a larger can, like for stewed tomatoes, would work better for larger flowers). Punch a hole or two in the bottom for drainage.
  2. Paste magazine cutouts around the can. Cover with Mod Podge if you want to make it last longer.
  3. Plant a flower or seeds with some extra potting soil & place it in a sunny spot to watch it grow!


This project has been featured at AllFreeHolidayCrafts.com! Check it out!

4 Comments

Filed under Activities, Crafts, Holidays

Cheesy Beefy Stuffed Shells.

Sorry, no Martha pictures yet… My friend Halley took all the photos (she’s a professional, so I knew they’d turn out better than if I took them), so when she gets them to me, you’ll be the first to know! But I will tell you that we showed up for the 999th show (missed the big 1000 by ONE DAY!) & Jason Priestly was the guest, if you’re looking for it on Hallmark Channel. More details to come later!

The following recipe is probably my most-requested by dinner guests. It’s also one of The Munchkin’s favorite dinners, if not her absolute favorite, & one of my husband’s favorites too.

Oddly enough, it came out of a Pillsbury cookbook mini-magazine — you know, the ones in the checkout aisle at the grocery store. (It happened to be the only worthwhile recipe in the whole $3.99 thing, but it was worth it.)

You see, when I was first married, I was the queen of semi-homemade. Not like Sandra Lee — I didn’t even know who she was back then — but as a full-time student, part-time employee, & new wife, my version of cooking a balanced meal was adding a chicken breast & some frozen broccoli to a box of Pasta-Roni. (I think we’re all glad those days are over.) Fortunately for everyone involved, this semi-homemade recipe has enough different flavors that it doesn’t taste like you opened a jar of this & a box of that & mixed it all together.

These shells freeze well, reheat well for leftovers, & are just a great comfort-food dish that looks like you put more work into it than you did! I also like taking it, unbaked, in foil pans, with cooking instructions, to new moms so they can just heat it up when they want.

  • 24+ jumbo pasta shells (in case of breakage, add a couple more. Also, some brands of “jumbo” shells are less “jumbo” than others. You may need as many as 30-32 if you’re shopping at, say, Kroger in, say, Indiana. Just saying.)
  • 1 lb. lean ground beef
  • 1 jar (26 oz.) chunky pasta sauce (I like the Ragu tomato & basil)
  • 1/4 cup water
  • 1 container (8 oz.) chive & onion cream cheese spread
  • 1 1/2 cups shredded mozzarella or Italian cheese blend
  • 1/2 cup grated parmesan
  • 1 egg
  • 1-2 Tbsp. chopped fresh parsley, if desired
  1. Preheat oven to 350. Cook shells, as directed on package, to al dente. A couple minutes before they’re done, add a little olive oil to prevent sticking. Rinse shells with cold water & drain (you may need to do this a couple times) to stop cooking & make them cool enough to handle.
  2. While shells are cooking, brown ground beef in a skillet over medium-high heat. Season with a little garlic salt & Italian seasoning. Drain & let cool slightly.
  3. Pour a little of the pasta sauce (about down to the top of the label on the jar) into the bottom of a 9×13 baking dish. (I usually split the recipe in half, using a smaller dish for the half I’m making now & using foil cake pans for the half I’m freezing until later.) Add a little of the water & spread it evenly on the bottom of the dish. Add the rest of the water to the jar, screw the lid back on, & shake to incorporate.
  4. In a medium bowl, combine cheese spread, 1 cup of the mozzarella, the parmesan, egg, & cooked ground beef.
  5. Spoon a heaping tablespoon of the mixture (I actually use a table spoon, like from your silverware set) into each shell & arrange the shells over the sauce in the baking dish. (This is the most time-consuming part.)
  6. Pour the remaining sauce over the shells, making sure to cover the shells completely.
  7. Cover with foil & bake 40 minutes or until bubbly & filling is set. Remove foil; sprinkle shells with remaining mozzarella. Bake 5 minutes longer or until cheese is melted. Sprinkle with parsley if desired.

If you choose to freeze part of your batch, use the foil pans for easy cleanup, cover with foil, & put the whole thing in a freezer storage Ziploc bag. Store it flat in the freezer. The night before you’re planning on making it, put the whole thing, bag & all, into the fridge to defrost. Then bake as usual (you may need to add 5 minutes). The filling will be a little less firm than the fresh batch, but otherwise, it tastes the same & you only had to do the work once for two meals!

7 Comments

Filed under Recipes

Martha Stewart & other crafting & culinary geniuses.

Guess where I get to go tomorrow? I’m very excited. I plan to post lots of photos & neat things I learned!

But in the meantime, here are some great recipes & ideas I’ve found & tried from around blogland that I wanted to share: (All pictures are copyrighted by their respective blog owners because I didn’t take my own.)

This pasta with asparagus & marinara, from Gina’s Skinny Recipes, was a huge hit with our family! I saved time & money by using regular parmesan plus a pinch of salt in the marinara instead of Pecorino Romano, & making the marinara with the Tuttorosso Crushed Tomatoes with Basil, rather than having to buy & chop fresh. I also used whole-grain bowtie pasta for added protein & fiber. (P.S.: The leftover marinara tastes amazing as a breadstick dipping sauce.)

At the complete other end of the omnivore spectrum was the huge, delicious steak I grilled using The Frugal Flambe’sGrilling without a Grill” method. It was perfectly done through, & without all the smoke of the stovetop method I found on another blog before. So great when you want a steak but you live in an apartment complex!

How cute are these free printable candybar wrappers from Anything But Perfect? I’ve already made some to give to the ladies I visit-teach! What a great Easter treat!

Speaking of Easter, Quit Eating Out featured a fabulous recipe to teach an object lesson about the true meaning of the holiday. These Resurrection Rolls are made of a crescent roll that represents the shroud in which Christ was wrapped. The marshmallow inside “disappears” while the roll is in the oven — “He is not here, for He is risen, as He said. Come, see the place where the Lord lay.” (Matt. 28:6) We’re definitely making these with The Munchkin on Sunday!

Last but not least, the only thing better than a great recipe is when one great recipe makes two great meals. I started with these fabulous barbecue chicken sandwiches from the Reluctant Entertainer. (I skipped the broccoli slaw this time, but doesn’t it look yummy?) I just tossed everything in the Crock Pot on low for 5 hours, then shredded the chicken & put it back in for another hour. The sandwiches were so delicious! But wait, there’s more…

The recipe made more than enough for the 3 of us. I saved the half we didn’t eat because I had another delicious meal in mind. My friend Kelsey shared this Barbecue Chicken Braid recipe from Mel’s Kitchen Cafe with me some time ago, but I wasn’t so hot on taking the time or forethought for making bread dough ahead. But thanks to our fabulous local bakery’s Greatest Pizza Dough Ever for $1.75, & my delicious leftover barbecue chicken, I finally got to try it out. I’ll tell you what — I can’t believe I waited so long! These two recipes will forever be linked to one another on my weekly menu. 

Until next time, look for me on Martha!

3 Comments

Filed under Crafts, Holidays, Recipes

Painted Easter Cookies.

How’s this for a fun new take on cookie decorating?

Truth be told, it’s only sorta new. You see, the original idea came from my Grandmother, LaRee. She was the kind of homemaker I aspire to be: fabulous cook, incredible seamstress, great pianist (& even wrote music!), & celebrated holidays like no one else.

Every Christmas, my aunt Becky gives the whole family a great gift: a piece of our family history. This past Christmas she wrote about some of Grandmother’s holiday traditions, & even included some of her old recipes! (You can bet I’ll be trying & blogging her Milkless Pumpkin Pie this fall!) One of those traditions was painting gingerbread cookies at Thanksgiving time. The “paint” was egg yolk & food coloring — they didn’t worry about salmonella back then. I thought it was such a fun idea! But obviously, the salmonella bit had to go.

I baked my favorite sugar cookie recipe; this is the recipe that I come back to every time, like a good hairdresser — when you stray, you always end up feeling sorry you did. I got it from a coworker whose wife made them for a potluck of some kind years ago. I hope she doesn’t mind that I’m stealing it & reposting it (at the end of the post) for the world to see, but it really is the perfect cookie — thick, soft, & always delicious. Then I frosted them with I Am Baker’s famous glaze for a nice, hard white surface to paint on.

The next day, The Munchkin’s friend & her mommy came over to paint with us! The paint was a grand experiment that thankfully went right: a healthy glob of gel food coloring (we wanted vivid colors for the girls; if you want a lighter, more watercolor-esque effect, start with very little), plus a drop of corn syrup to stabilize, plus a couple tablespoons of water. I put a different color in each well of a muffin tin & had different brushes for each color to avoid mixing. The brushes were brand new & very well rinsed before using.

The girls had a blast! The Munchkin’s friend, who’s almost exactly a year older than her, was very careful & intent in her painting: she covered each cookie entirely in one color, switching colors only with new cookies.

You could tell the girls’ cookies apart in 2 ways: 1) The Munchkin enjoyed mixing her colors, & 2) the bite marks.

Once the girls got tired of the painting, the mommies got to have a turn. My friend Wendy is a cookie-egg-decorating master, I’ll tell you what.

(Special Easter Bunny tip: if you have small children, skip the fake grass — go with tissue paper instead. Your carpets, vacuum cleaners, domesticated animals, & sanity will thank you.)

Now, before you rush off & go paint some Easter masterpieces yourselves, here are a few things we learned:

One – If the colors touch, they will run. Leave a generous white border between colors, or you’ll get this:

Two – Food coloring isn’t as washable as Crayola. Expect your hands to look like this for a day or two if you have a particularly young &/or messy child:

Three – The corn syrup makes the paint a little sticky, even after drying, so for storage, shipping, packaging, etc., use parchment paper.

Four – No matter what holiday it is or what we’re decorating cookies for, as long as My Husband The Cougar Fanatic is around, there will always be a BYU athlete. Always.

Five – This was totally AWESOME!!!

Here’s the Perfect Sugar Cookie recipe, courtesy of my coworker’s wife, Grace:

  • 1 1/2 cups butter, softened
  • 2 cups sugar
  • 4 eggs
  • 1 tsp. vanilla (I usually let a little “spill over” to add just a teeny bit more)
  • 5 cups flour
  • 2 tsp. baking powder
  • 1 tsp. salt
  1. Cream butter & sugar until smooth.
  2. Beat in eggs & vanilla.
  3. Add dry ingredients gradually & mix until well combined.
  4. Chill one hour to overnight.
  5. Preheat oven to 400.
  6. Roll dough out on lightly floured surface, 1/2 inch thick, & cut with cookie cutters.
  7. Bake 6-8 minutes.

Enjoy, & have a happy, sweet, & colorful Easter!

Tidy Mom

10 Comments

Filed under Activities, Holidays, Recipes

Simple Seven-Ingredient Stir-Fry.

In case the several-day lapse between posts wasn’t a dead giveaway, I’ve been letting a few things slide this week. The Munchkin decided that sleeping past 6:30 was overrated, & who needs naps? Oh, Mommy, but who’s counting, really? Added to my exhaustion were the two city trips we took (one to the Central Park Zoo on a Saturday — holy crowds, Batman!) just to wear her out enough to get her to sleep at night.

So I really needed something fresh & easy for dinner the other day. & delicious.

Oh, & did I mention, beautiful? Look at those colors! Wow!

Thank you, Kikkoman Preservative-Free Low-Sodium Stir-Fry Sauce, for thoughtfully printing the delicious product-placement recipe on the back of the bottle that inspired this Simple Seven-Ingredient Stir-Fry.

  • 1-2 cups uncooked rice
  • 1 Tbsp. cornstarch
  • 1 Tbsp. soy sauce
  • 1 lb. stir-fry beef (or cut sirloin into thin strips)
  • 2 Tbsp. oil, divided (NOT EVOO — you need something with a higher smoke point. Sesame oil works best; I used regular old vegetable oil.)
  • 1 bag frozen stir-fry veggies (we like the Great Value Sugar Snap Stir-Fry variety)
  • 1/2 cup stir-fry sauce
  1. Prepare rice as directed.
  2. Combine cornstarch & soy sauce in a shallow bowl. Coat beef strips in mixture.
  3. Heat 1 Tbsp. oil in wok or large skillet over high heat. Add beef; stir-fry 2 minutes. You want a good sear, but don’t want to overcook the beef or it’ll get tough. Remove beef.
  4. Reduce heat to medium-high. Heat 1 Tbsp. oil, then add still-frozen veggies. Stir-fry 5 minutes or until done through.
  5. Add sauce & beef; stir 1 minute or until well coated in sauce.
  6. Serve over rice.


Linking up to Works for Me Wednesday at We ARE That Family!

Leave a comment

Filed under Recipes

The best banana muffins. Ever.

I never have just the right number of bananas. It seems like if I buy a bunch, they’re brown in 3 days, but if I only get like 3, they’re gone the next day. It irritates me to no end. (I know, how boring does my life have to be for brown bananas to send me into a hissyfit?)

So anyway, I had six — count ’em, six — brown bananas & was looking around blogland for something new to do with them. (How did we ever cook before the Internet, seriously?) That’s when I saw The Best Banana Muffins EVER (her title, now being adopted by me because it’s true — like how the state of Utah was allowed to keep “The Best Snow on Earth” on its license plates despite a lawsuit from Barnum & Bailey) featured on These Chicks Cooked.

Now, I’m generally not the type to walk into a bakery with cases full of Napoleons, eclairs, & other such pastries & say, “Hey, that banana muffin looks like the tastiest thing in here!” I’m also not the type to say, “Hey, I think I’ll whip up some banana muffins” if there are cookies or brownies to be had. But when I pulled those muffins out & bit into one (or two… or several…), all I could say was “Wow.” Husband bit into one when he got home. “Wow.” Definitely The Best Banana Muffins EVER.

  • 1 cup sugar
  • 1 1/2 cups flour (next time I’ll try half all-purpose, half whole-wheat to see what happens)
  • 1 tsp. baking soda
  • 1 tsp. baking powder
  • 1/4 tsp. salt
  • 1/2 cup butter, melted
  • 2 eggs
  • 3 bananas, mashed
  1. Preheat oven to 350. Place paper baking cups in a muffin tin. (They’re sticky enough I would definitely not skip this.)
  2. Combine dry ingredients.
  3. Mix in wet ingredients until well blended.
  4. Spoon into muffin cups; bake 25-30 minutes.

The next morning, The Munchkin was playing quietly in her room, so I took the opportunity to photograph my handiwork in the one spot in the apartment with any direct sunlight (& we only get it for a few hours, so it’s a precious commodity). I took the picture above, then reset a little & saw this through my viewfinder:

You can’t make this up.

She didn’t say “Wow,” probably because that’s not in her few-dozen-word vocabulary yet, but she ate like 3, so in my book that counts. Definitely The Best Banana Muffins EVER… Or at least Banana Muffins Worth Thieving.

Now, what do I do with those other 3 bananas?

Tidy Mom

7 Comments

Filed under Recipes

Wordless Wednesday: Ode to Coloring Pages.

My kid has decided to be prejudiced against newsprint coloring pages. She refuses to color in any of her coloring books.

So what’s a girl to do when she wants to “kuwee”?

Print off new pages, of course!

This is my first time linking up to Wordless/Wordful Wednesday. Check it out here!

2 Comments

Filed under Activities