Tag Archives: egg-free

Colorful Chicken Veggie Stir-Fry

Gluten-free | Dairy-free | Egg-free | Nut-free | Clean eating option | Soy-free option

IMG_2634

This is a great, easy, adaptable weeknight option for getting lots of protein and colorful veggies with minimal effort! Just include whatever veggies your family likes (or at least will tolerate) and watch them scarf it down!

Colorful Chicken Veggie Stir-Fry

Original recipe here

  • 1 lb chicken breasts, cut into bite-sized pieces
  • 1/4 cup gluten-free tamari sauce (or soy sauce)*
  • 1 Tbsp rice vinegar (apple cider vinegar works great too)
  • 1 tsp sesame oil (optional)
  • 2 cloves garlic, minced
  • 1/4 tsp ground ginger
  • up to 1/4 tsp red pepper flakes
  • 3/4 cup low-sodium chicken broth (gluten-free)
  • 2 tsp corn starch
  • 1 Tbsp grapeseed oil (or other high-heat oil like canola), divided
  • up to 6 cups assorted veggies (I used halved baby carrots, diced red pepper, frozen broccoli florets, frozen peas, and frozen corn–just use what you have on hand. Other suggestions: zucchini, squash, red onion, edamame, etc.)
  • cooked rice, for serving (use brown rice for clean eating)

*For soy-free, try coconut aminos

  1. Combine tamari sauce, vinegar, sesame oil (if using), garlic, ginger, and red pepper flakes in a medium bowl, then add chicken and toss to coat.
  2. Marinate 10 minutes in the refrigerator, then drain, reserving marinade in a measuring cup. Add chicken broth, then whisk in corn starch until smooth.
  3. Heat 1 tsp oil in a large wok or nonstick skillet over medium-high heat. Add chicken. Stir-fry until cooked through. Set aside.
  4. Increase heat to high and add remaining 2 tsp oil to wok. Add veggies in order of how long they take to cook: carrots obviously are first, then broccoli, then smaller veggies. Remember frozen veggies take less time to cook. Stir-fry until crisp-tender; do not overcook, as they’ll continue to soften when you add the sauce.
  5. Add chicken and sauce, then stir-fry until sauce has begun to thicken, 2-3 minutes.
  6. Serve over cooked rice.

1 Comment

Filed under Recipes

Going Gluten-Free: Super-Easy One-Skillet Chicken with Cilantro-Lime Black Bean Rice.

Gluten-free | Dairy-free | Soy-free | Nut-free | Egg-free

IMG_2648

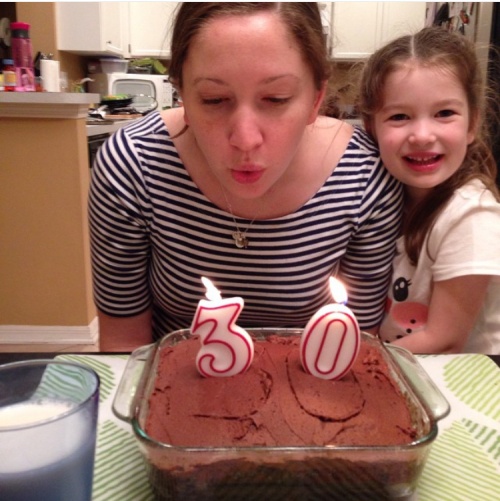
My middle daughter (the strawberry gelato aficionado from my last post) was recently diagnosed celiac just before her 5th birthday. Over the past couple of months, I’d noticed some changes in her that worried me: she was sleeping later than either of her sisters, but was still tired all the time, wearing out much more quickly than usual. She complained often of belly pain and growing pains, she had circles under her eyes, would often get unexplained low-grade fevers, and she was much more easily irritated. So I called our pediatrician’s nurse line and expressed my concerns, asking if we could get some blood work done before her 5-year checkup. The doctor wanted to see her right away after hearing the symptoms I was describing, and ran a full panel for everything from mono to anemia, diabetes to liver dysfunction, cancer to celiac. Her celiac numbers were astounding, and we were referred to a GI specialist right away. At that visit, she weighed in at 34 pounds. 5 days before her 5th birthday. Being in the 90th percentile for height. Her dot was 2 full inches BELOW the BMI curve. I knew something wasn’t right, but I wasn’t prepared for that shock.

As you know from my MSPI posts, we’re no strangers to accommodating dietary changes, but as hard as it was do avoid dairy and soy, I knew that it was temporary; I only had to cut them out for 6 months until my baby’s stomach was strong enough to get it through my milk, and my now-almost-3-year-old grew out of it at 18 months. Being told that celiac was a change for life–and an autoimmune disease, no less–and that she was so malnourished as a result of the malabsorption that we were one step away from a feeding tube, was a LOT to take in. (Keep in mind we’re also expecting baby #4 in 2 months, are getting a house ready to sell, and are building a house.)

But my pity party is over (for the time being) and now I’m setting to work researching recipes and finding gluten-free snacks that my pickiest eater (of course it WOULD be my pickiest eater) will eat so that she can catch up to her growth curve.

I’ve had some success adapting some of her favorites of my old standbys (I’ll do a separate post about those), but while I have the time before Baby comes, I’m trying to expand my repertoire of naturally gluten-free meals that are easy and don’t require the separate pots and pans needed to prevent cross-contamination (I told you it’s a lot to take in).

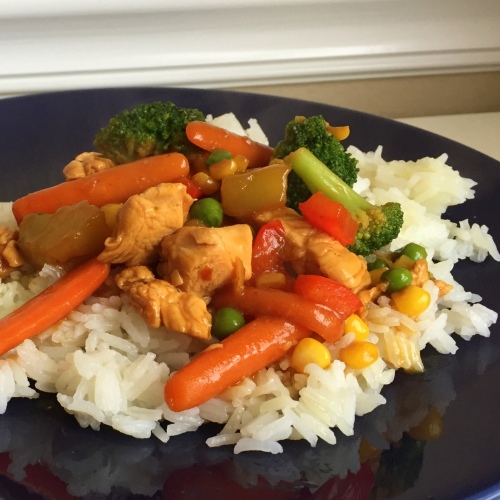
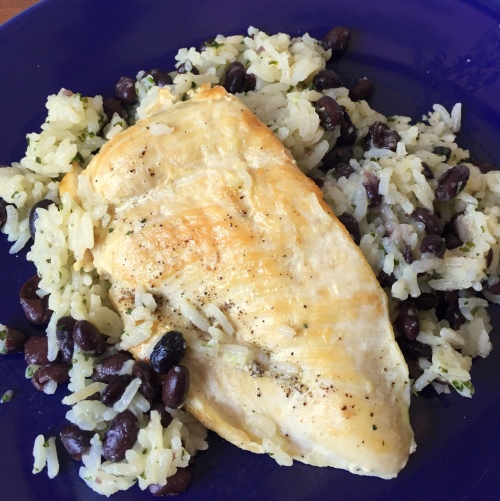
If you’ve been around for awhile, you already know what big fans we are of the many variations of chicken-and-rice dishes, but one of the challenges of gluten-free eating is finding ways to keep the fiber content up when we’re so used to eating whole-wheat almost everything. So I love that this easy one-skillet meal mixes the beans right in with no effort!

One-Skillet Chicken with Cilantro-Lime Black Bean Rice

Adapted from here

  • 1 Tbsp olive oil
  • 4 boneless skinless chicken breasts (or use skin-on thighs like in the original recipe)
  • salt and pepper
  • 2 cups low-sodium chicken broth (make sure it says “gluten-free”)
  • 1/2 cup water
  • 1/4 tsp salt
  • 1/2 tsp cumin
  • 4 cloves garlic, minced
  • 1 cup jasmine rice
  • 1-2 Tbsp (I used 1 1/2) fresh-squeezed lime juice (can be bottled; I add a drop of Lime essential oil to mask the bottled taste)
  • 1 1/2 Tbsp dried cilantro (or 1/4 cup fresh chopped)
  • 1 can black beans, rinsed and drained
  1. Heat a wide, deep skillet with lid on medium-high and add the olive oil. Swirl to coat the bottom of the pan. Season both sides of the chicken with salt and pepper, then lay them face down in the pan and brown 4 minutes–careful not to burn.
  2. Turn chicken breasts and brown on medium heat 2 more minutes. Remove to a plate (they won’t be done through yet).
  3. To the same skillet, add chicken broth, water, salt, cumin, garlic, and rice. Stir to incorporate and bring to a boil. Place chicken on top, making wells in the rice for each chicken breast, reduce heat to a simmer, cover, and cook 15 minutes or until rice is tender, moisture is absorbed, and chicken is done through.
  4. Remove chicken to a plate and add lime juice (start with 1 Tbsp), cilantro, and black beans. Taste and adjust amount of lime juice. Then place chicken breasts on top to serve.

2 Comments

Filed under Recipes

Clean(er) flourless brownies with fudge frosting.

Gluten-free | Mostly clean eating | Soy-free | Nut-free | Egg-free | Dairy-free option | Vegan option

img_1795

If you’re looking for a healthier treat (maybe for Valentine’s Day?) that still tastes just as rich as sinful, these might just be it. They’re moist and fudgy (especially with the fudge frosting!), without all the butter, flour and (most of the) refined sugar (depending on which brand of yogurt you use; more on that later).

Now, I will say that these are not something I would make when I’m having a spur-of-the-moment chocolate craving because they require a lot more planning and time than my one-bowl delicious brownies, but when you’ve got a chocolate craving AND you’re trying to work around dietary restrictions, the little bit of extra work makes it worth it. Plus I don’t feel like a total blob after eating a couple of these–and it’s much easier to stop at one or two with these than with my usual go-to recipe because they’re so much richer. So wins all around!

As for the brand of yogurt, this is important: You need to find a vanilla Greek yogurt that’s pretty thick. I like Oikos Triple Zero, but wound up using an organic variety that happened to have refined sugar in it instead of the stevia because I wanted a truer flavor; either way, you usually need two of the small cups to make this recipe. If you’re going dairy-free, you can try a coconut yogurt, but your ordinarily-very-thick batter will be thinner, which may affect baking time, so keep an eye on it. Borderline underdone is better than the alternative. If you do try the coconut yogurt, please let me know how it goes! I just couldn’t do coconut yogurt when I was dairy-free: not enough protein to warrant the expense and all the sugars. But when that’s what you’ve got to work with, I totally get it, and I would love nothing more than for these to work for you!

Cleaner Flourless Brownies

Adapted from here

  • 1 1/2 cups Enjoy Life semisweet mini chocolate chips, or similar, divided
  • 3 fl oz (1/4 cup plus 2 Tbsp) melted virgin coconut oil (measure after melting)
  • 1 cup vanilla Greek yogurt or coconut yogurt (see note above about brand)
  • 1 tsp pure vanilla extract
  • 1/2 tsp salt
  • 1/2 tsp baking soda
  • 3/4 cups oat flour (blend or process regular oats in a blender or food processor until fine)
  • Fudge Frosting (below)
  1. Preheat oven to 350 and line a square baking dish–8×8 or 9×9–with parchment, then lightly spray with soy-free cooking spray.
  2. Place melted coconut oil and 1 cup of the chocolate chips in a microwave-safe bowl and microwave in 30-second intervals, stirring in between, until chips are melted. (Should take only 2 or 3 rounds in the microwave.)
  3. Pour melted chocolate into a medium mixing bowl and add yogurt; mix well. Stir in vanilla, salt, and baking soda.
  4. Stir in oat flour until incorporated, then fold in remaining 1/2 cup chocolate chips.
  5. Spread mixture (it will be quite thick) evenly in prepared pan, then bake 28 minutes or until a toothpick inserted in the center comes out mostly clean.
  6. Remove from oven and allow to cool completely in pan, then frost with Fudge Frosting (below).
  7. Frosted brownies will keep on the counter in a sealed container up to a week.

Fudge Frosting

Adapted from the more time-intensive version I made here

  • 1/2 bag Enjoy Life semisweet mini chocolate chips
  • 2-4 Tbsp coconut cream,* or similar amount of yogurt used above, or combination

*Coconut cream: refrigerate a can of coconut milk several hours, until it separates. Remove the can very carefully, without shaking it, and open it without disturbing the cream. Carefully spoon the cream from the top of the can, reserving the coconut water at the bottom for later use in a smoothie or something.

  1. Place chips and coconut cream or yogurt in a small saucepan over medium-low heat. Heat while stirring constantly, until melted and incorporated.
  2. Add more cream or yogurt until the mixture reaches a smooth, medium consistency. You want it to be not too thin but still spreadable. I started with a couple tablespoons of coconut cream because that’s all I had, then added yogurt a tablespoon at a time.
  3. Pour into a bowl and chill in the refrigerator a few minutes until just set, then remove, stir, and spread evenly over the cooled brownies.
  4. Allow to set–may take up to an hour–and then cut brownies into 16 squares and enjoy!

1 Comment

Filed under Recipes

Wacky Cake: No eggs, milk, butter, or bowl needed.

Dairy-free | Soy-free | Egg-free | Gluten-free option | Nut-free

It’s my birthday week, so I thought I would share a birthday cake recipe!

IMG_7192

I found out my baby was MSPI three weeks before my 30th birthday. I was so dejected at the prospect of not being able to have cake on my birthday. But just a week later, this recipe started making the rounds on social media. It has been a lifesaver for me. It won’t win any awards for Most Delicious Cake In The History Of Ever, but when you don’t have another option, it tastes like the best thing on Earth.

It’s called Wacky Cake, or Crazy Cake, or Depression Cake–because lore says it was popular during the Great Depression, when eggs and butter were scarce, and because you actually make depressions in the dry ingredients to add the liquid ones. It rises thanks to the exothermic reaction between vinegar and baking soda and makes a great experiment with your kids. This is a great option for people who can’t have eggs or dairy–and I’ve read that it works well with gluten-free flours as well.

There are a few ways to make it. All of the different options are listed at another blog, but here are the ones I’ve tried and tweaked: Chocolate, Vanilla, and single-serving Mug Cake versions of both. I’ll tell you right now the chocolate is definitely the better tasting, but for those who prefer it, the vanilla option is there. That’s what we did for my MSPI baby’s first birthday, because she hadn’t had chocolate yet. For her birthday party a few days later, I used the chocolate mug cake recipe to make an extra-small batch of cupcakes so that she could have her own dairy-free cupcake while everyone else ate carrot cake.

I’ve also got the recipes for chocolate fudge frosting and vanilla “butter”cream frosting. So this will be a long post, but hopefully a useful one!

IMG_7193

Chocolate Wacky Cake

  • 1 1/2 cups flour
  • 3 Tbsp. cocoa powder
  • 1 cup granulated sugar
  • 1 tsp. baking soda
  • 1/2 tsp. salt
  • 1 tsp. white vinegar
  • 2 tsp. vanilla
  • 5 Tbsp. canola oil
  • 1 cup water
  1. Preheat oven to 350 and grease an 8-inch square or round pan.
  2. Combine dry ingredients in prepared pan (for round cake pan, mix all ingredients in a bowl and then pour the batter into the pan). Make 3 depressions in the flour mixture with your thumb. Pour the vinegar in one, the vanilla in another, and the oil in the third (it will overflow). Pour the water over all of it. Mix until completely incorporated.
  3. Bake 35 minutes or until a toothpick comes out clean. Cool completely before frosting.

Original recipe here

2-ingredient Chocolate Fudge Frosting 

Note: This is easy, but requires at least a day of advance planning.

  • 1 can full-fat coconut milk
  • 1 bag Enjoy Life semi-sweet mini chocolate chips
  1. Chill the can of coconut milk in the fridge overnight. Remove carefully from the fridge–DO NOT SHAKE–and carefully open. Spoon out the cream that has separated to the top into a saucepan. (You do not need the liquid “coconut water” underneath; save it to use in a smoothie later!)
  2. Add the chocolate chips to the saucepan. Melt them together over low heat, stirring frequently.
  3. Pour the melted chocolate into a mixer bowl, cover with plastic wrap, and refrigerate 2-3 hours or overnight. (Usually I refrigerate overnight, then leave it on the counter for the morning to soften a little.)
  4. Whip it with a hand mixer or the whisk attachment on your stand mixer until smooth and creamy. It will be a thick, ganache-like consistency. Thin with nondairy milk if desired, but really, you don’t need to. Add a pinch of sea salt if it floats your boat.
  5. Resist the urge to just eat the whole batch with a spoon, and frost your cake as desired.

Original recipe here

IMG_7191

Vanilla Wacky Cake 

  • 1 1/2 cups + 3 Tbsp. flour
  • 1 cup granulated sugar
  • 1 tsp. baking soda
  • 1/2 tsp. salt
  • 1 tsp. white vinegar
  • 2 tsp. vanilla
  • 5 Tbsp. canola oil
  • 1 cup water
  1. Preheat oven to 350 and grease an 8-inch square or round pan.
  2. Combine dry ingredients in prepared pan (for round cake pan, mix all ingredients in a bowl and then pour the batter into the pan). Make 3 depressions in the flour mixture with your thumb. Pour the vinegar in one, the vanilla in another, and the oil in the third (it will overflow). Pour the water over all of it. Mix until completely incorporated.
  3. Bake 35 minutes or until a toothpick comes out clean. Cool completely before frosting.

Original recipe here

Vanilla “Butter”cream Frosting

  • 2 sticks (1 cup) Earth Balance soy-free buttery stick, room temp
  • 6 cups powdered sugar
  • 2 tsp. vanilla
  • almond milk for thinning (optional)
  • 1 Tbsp. meringue powder (optional)
  • food coloring (optional)
  1. Using the paddle attachment on your stand mixer, cream the Earth Balance until smooth. Scrape the sides of the bowl, then add about half of the powdered sugar, mixing until incorporated.
  2. Add vanilla. Mix in remaining powdered sugar gradually, pausing to whip the frosting mixture at high speed before adding more sugar, until the frosting looks thick enough. Whip at least a minute more and adjust powdered sugar or almond milk amounts as desired. Add meringue powder if you want your frosting to hold its shape during decorating.
  3. Dye with food coloring if desired.

Quick Single-Serving Microwave Mug Cake – Chocolate or Vanilla

  • 5 Tbsp. flour
  • 4 1/2 Tbsp. granulated sugar
  • 2 tsp. cocoa powder (for vanilla, add an additional 2 tsp. flour instead)
  • 1/4 tsp. baking soda
  • dash salt
  • 1/2 tsp. white vinegar
  • 1/2 tsp. vanilla
  • 2 tsp. canola oil
  • 4 1/2 Tbsp. water
  1. Grease the inside of a large ceramic mug. Combine dry ingredients inside, mixing well with a fork.
  2. Use your index finger to make 3 depressions in the flour mixture. Pour vinegar in one, vanilla in the second, and oil in the third (it will overflow). Pour water over all. Mix with fork until very well incorporated.
  3. Place in microwave and cook, uncovered, on high 1 1/2 – 2 minutes–it will vary depending on your microwave. Don’t overcook! Remember there are no eggs, so a little underdone is ok–even delicious!
  4. Top with dairy-free chocolate chips, So Delicious CocoWhip, or whatever you like! Eat warm.
  5. FOR SMALL BATCH OF CUPCAKES: This recipe will fill about 3 cupcake liners. Fill remaining wells of your tin with water, then bake at 350 for 12 minutes or until a toothpick comes out clean. You’ll have to watch them carefully.

Original recipe here

1 Comment

Filed under Recipes