Tag Archives: Christmas

Clean Gingerbread (that doesn’t taste clean!)

Clean eating | Dairy-free | Soy-free | Nut-free

DSC_0095

I love gingerbread cookies. My girls love decorating gingerbread cookies. The problem: since I’m the only one who likes eating them, I wind up eating all of them. 

So this year I wanted to try something a little different. My husband made me promise not to “ruin Christmas” by changing all of our time-honored traditional recipes to clean ones. But I’m the only one who usually eats the gingerbread, right? And I had to change it to dairy-free for my youngest anyway, right? So I went on the hunt.

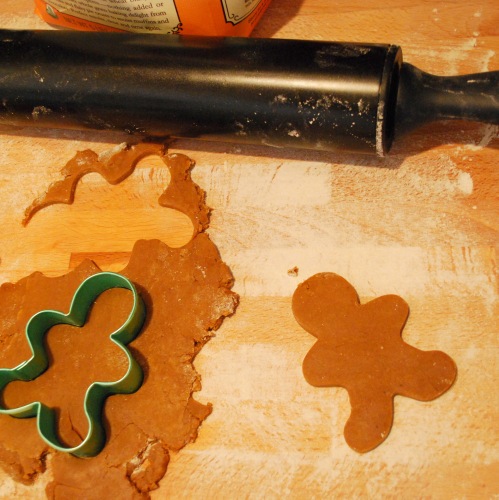
These are great. They require little to no chilling time, so you can get them made and decorated in an afternoon. They don’t spread. They’re sweetened with maple syrup and molasses, the whole-wheat pastry flour keeps the texture the same as we’re used to, and they’re not too spicy and don’t contain cloves, so guess what? My family likes these! Turns out they just didn’t like my old, spicy gingerbread recipe. Maybe I should’ve made a double batch so I could have some to myself!
DSC_0090

Clean Gingerbread Cookies (makes about 18, 3.5-inch-tall cookies)

Adapted from here

  • 1 egg, room temp
  • 1/3 cup coconut oil, melted and cooled
  • 1/3 cup maple syrup, room temp
  • 1/4 cup unsulphured molasses, room temp
  • 1/2 tsp. vanilla
  • 1 tsp. ginger
  • 3/4 tsp. cinnamon
  • 1/2 tsp. ground nutmeg
  • 1/8 tsp. allspice
  • 1/2 tsp. baking soda
  • 1/4 tsp. salt
  • 2 1/4 cups whole-wheat pastry flour, plus more for rolling out dough
  1. Preheat your oven to 350 and line a baking sheet or two with parchment.
  2. In a large mixing bowl, beat the egg. Add coconut oil, syrup, molasses, vanilla, spices, soda, and salt, and whisk well.
  3. Add flour and mix until incorporated, using your hands when it gets too thick for the spoon.
  4. If desired, chill for half an hour or so.
  5. Lightly flour your work surface and rolling pin, then roll out to 1/4 inch thick. Cut with cookie cutters and place on cookie sheet.
  6. Bake 9-12 minutes depending on the size of your cookie cutters and how soft you want them. Mine are about 3 1/2 inches tall and I like them soft, so 9 minutes is plenty for me.
  7. Cool completely before decorating.

To decorate:

If you want to keep it totally clean, look at the original recipe for ideas of natural toppings to sprinkle onto maple-brushed cookies. My girls like to decorate theirs with frosting to look like real gingerbread men, so I made a dairy-free icing that we could pipe on. It’s not clean, but there’s so little on the cookies that we’re still balancing 80/20, right?

Dairy-free icing

(Not a recipe so much as “here’s how I did it this time because it worked”)

  • 1/2 cup shortening or Earth Balance buttery stick
  • if using shortening: pinch of salt
  • coconut cream from 1 can of coconut milk
  • powdered sugar, 2 cups plus, to desired consistency
  • 1/2 tsp. vanilla
  • optional: 1 tsp. meringue powder, to help it hold its shape
  1. Add ingredients to your stand mixer gradually, adding powdered sugar until desired consistency.
  2. Spoon into piping bag. Pipe onto cookies.

2 Comments

Filed under Holidays, Recipes

Make your own Minnie (or any) Mouse ears!

For Christmas, we decided to give The Munchkin a Disney World vacation. We just got back from a long weekend of riding Teacups (3 times!), walking a LOT, & meeting pretty much every character there is. We all had a blast!

While contemplating how to present her with her Christmas gift, I decided to give her some Minnie ears, knowing that she’d probably ask for some once she saw everyone else wearing them anyway. Making them was a much cheaper option than buying them, & after her Angelina Ballerina Halloween costume, I had already mastered the proper “ear technique.” I simplified the method I found here for both sets of ears.

  • a headband in your desired color
  • a sheet of scratch paper & a pen
  • a sheet of stiffened felt (preferably the adhesive kind) in your desired color
  • sharp scissors
  • a glue gun
  • optional: wide wired ribbon for the bow
  • optional: another piece of stiffened felt in a contrasting color if you’re making “real” mouse ears like I did for Angelina
  1. Begin by finding a round object like a glass in the right size for your ears. Trace the glass onto your paper. Then draw a little rectangle below that about half the width of your headband. There may be some trial & error finding just the right size to fit around the headband. Fold the paper at the bottom of the rectangle & cut out the shape so there’s a mirror image at the bottom that resembles a dumbbell.
  2. Trace that shape onto the back (adhesive side) of your felt, then cut it out.
  3. Mark on your headband where you want your ears to go. Remove the adhesive from your felt, then put a line of hot glue on the underside of the headband in the appropriate spot for one ear & stick the felt there. Make lines of glue on the felt on either side of the headband & then do a glue circle a quarter to half an inch from the edge of one of the circles. Very carefully stick the whole thing together from bottom to top. The adhesive gives you less wiggle room (one stick is all you get — no repositioning), but it also creates a much better seal with no glue oozing out.
  4. Repeat on the other side. (Preferably while watching Top Gear, apparently.)
  5. Now for the bow. Cut a length of ribbon & loop it with ends together, then pinch in the middle. (Sorry it’s so blurry.) If you want a “poofier” bow, loop it twice & then spread the loops into kind of an X. Glue some of the overlapping bits in the middle together, if desired.
  6. Now cut several more inches of the ribbon. On the back (non-printed) side of the ribbon, place a dot of glue on the top middle & fold a third of it over lengthwise. Place another dot of glue on top of that & fold the remaining third. Now you have a skinny middle piece. Place another dot of glue on the back of one end of said skinny piece, secure it to the bottom side of your bow, & start wrapping it around the middle of the bow, securing with glue as you go. There will be some ribbon left.
  7. Finally, put a larger dot of glue on the top of your headband. Stick your bow to it, then wrap the skinny bit of ribbon around both it and the headband, once again securing with glue as you go.
  8. You’re done! (This is the picture of her after she opened her present on Christmas morning.)

Ta-da!


I'm Lovin' It at TidyMom

Get Your Craft On Tuesdays

3 Comments

Filed under Crafts

Pasta with broccoli & chicken in creamy tomato sauce.

My family just came to visit, & after a week of dining out, I was having serious grocery list writer’s block. What to make this week? Especially with Christmas falling in there too? Fortunately, I recalled one of our old favorites that I haven’t made in forever. We call it “Pink Sauce Chicken.”

(Admittedly, this is one of the least flattering photos imaginable. I’m beyond excited about the light scoop My Husband The Generous is “surprising” me with on Christmas!)

So you’re asking, “If it’s one of your favorites, why haven’t you made it in a long time?” The answer is that I got it from the Kraft Food&Family magazine, & they had the nerve to stop making one of the key ingredients. That’s the trouble with semi-homemade: you’re limited by the available ingredients.

But after like 15 minutes of standing in the salad dressing aisle with The Munchkin contentedly munching on a cookie in her green racecar cart (thank you Publix!), I found the substitute. & Pink Sauce Chicken never tasted better!

  • 6 small boneless, skinless chicken breast halves
  • Lawry’s 30-minute Marinade in Tuscan Sundried Tomato*
  • 8+ oz. uncooked short pasta (the recipe calls for bowtie)
  • up to 4 cups broccoli florets (we do more pasta & less broccoli)
  • 2 cloves garlic, minced
  • 2 cups jarred marinara sauce
  • 4 oz. Neufchatel cheese, softened
  • parmesan, to taste

* The recipe originally called for Kraft’s Roasted Red Pepper Italian dressing. The 30-minute Marinade does a great job, but has a little less liquid in it, so you need to watch that your chicken doesn’t scorch. If you can’t find the 30-minute Marinade, look for an Italian dressing with roasted red peppers relatively high on the ingredient list.

  1. Marinate chicken in some of the 30-minute marinade for — you guessed it — 30 minutes.
  2. Cook pasta as directed on package, adding broccoli for last 3 minutes (for frozen, last 4 or 5 minutes) of cooking time.
  3. Meanhile, heat 3 Tbsp. of the marinade in a large, nonstick skillet over medium heat. Add garlic & heat until fragrant.
  4. Add chicken; cook, covered, 5 min. to a side or until done in the middle. You may need to add more marinade/dressing to keep it from burning.
  5. Drain pasta mixture; return to pot & set aside. Cover to keep warm.
  6. Add pasta sauce & Neufchatel to the skillet. Cook, stirring frequently, until cheese is melted & mixture is well blended.
  7. Coat chicken in sauce, remove from skillet, & keep warm.
  8. Add sauce mixture to pasta mixture in pot; mix well. Transfer to 6 pasta bowls.
  9. Cut chicken across the grain into thick slices. Fan one breast half over the pasta in each of the bowls.
  10. Sprinkle liberally with parmesan cheese.

I'm Lovin' It at TidyMom

1 Comment

Filed under Holidays, Recipes

Reindeer cookies.

The Munchkin has been looking forward to making these for DAYS. & they turned out just as great as we hoped they would!

I had originally thought to do spice cookies, but The Munchkin said peanut butter, so that’s what we did! Lucky for us, Bakergirl had already made delicious peanut butter reindeer cookies! Hers are for mini reindeer, but I had full-sized “features,” so I made them full-sized. It yielded 18 cookies instead of 40.

  • 3/4 cup creamy peanut butter
  • 1 1/4 cup packed brown sugar
  • 1/2 cup shortening
  • 3 Tbsp. milk
  • 1 Tbsp. vanilla
  • 1 egg
  • 1 3/4 cup flour
  • 3/4 tsp. baking soda
  • scant 3/4 tsp. salt (I felt it was plenty salty from the peanut butter)
  • pretzels (I think chocolate- or yogurt-covered pretzels would “stick” better)
  • green M&Ms
  • red Cadbury Christmas Mini Eggs (or you could use peanut M&Ms, but I’m kind of obsessed with the Cadbury Mini Eggs, so we’re using those)
  1. Preheat your oven to 375. Line a baking sheet with parchment.
  2. Cream together first 5 ingredients in your electric mixer. Add egg & beat until just blended.
  3. (Optional: combine dry ingredients in a separate bowl.) Add to the wet ingredients & mix until just incorporated.
  4. Roll into 2-inch balls. Pinch one end between your thumb & forefinger for the “chin.” Then flatten between your palms. Place them on your prepared cookie sheet; I fit 9 on a sheet to keep them from spreading.
  5. Bake 9 minutes or until set in the middle & just starting to brown.
  6. Remove from the oven, & immediately (carefully!) press the pretzels in for antlers. Do this for all of the cookies right away; the pretzels don’t stick as well as the other “features.”
  7. Let your kitchen helper help you press in M&Ms for eyes (M side down, of course) & a Cadbury Mini Egg for a nose.

I was amazed at how good The Munchkin got at decorating these!

Her first attempts were rather… Picasso-like…

But by her 6th one, everything was in its proper place!

Who knew that cookie decorating could teach a two-&-a-half-year-old anatomy?
I'm Lovin' It at TidyMom

Join  us Saturdays at tatertotsandjello.com for the weekend wrap   up           party!

5 Comments

Filed under Holidays, Recipes

Healthy & Festive Holiday Party Appetizer.

Need ideas for something a little outside the box to bring to your Christmas party this weekend?

My friend Bethany made this for a Christmas recipe exchange a few years ago, & I think I probably ate half of it on my own. It’s tasty, healthy, & festive-looking!

For each tree (16 rounds), here’s what you need:

  • 1 can crescent rolls
  • 4 oz. cream cheese (I use Neufchatel), softened*
  • 1/4 cup sour cream*
  • 1/2 tsp. dried dill weed*
  • 1/16 tsp. (just fill the 1/8 halfway) garlic powder*
  • assorted veggies in various shapes to “trim your tree”

* If you’re not a fan of dill, you can substitute 4 oz. Garden Veggie Cream Cheese plus 1/4 cup sour cream

  1. Preheat your oven to 375. Line a cookie sheet with parchment. Unwrap your crescent rolls, but do not unroll. Cut each of the 2 sections into 8 slices to get 16 slices total. (This was when I realized my knife needed sharpening. You may need to reshape your rounds to make them…er… round again.)
  2. Place your slices cut side down on the parchment to form a 5-row triangle & a single one at the bottom for a “trunk.”
  3. Bake 11-13 minutes or until golden.
  4. Combine cream cheese, sour cream, dill, & garlic powder in a small bowl. Spread over the tree (not the trunk), leaving a border around the outside to make it easier for people to pull some off. (Once the edge pieces are taken, people tend to get the general idea, so you don’t need to top each round individually.)
  5. “Trim your tree” with your veggies. Tip: start with your “greenery” (broccoli or snipped green onions). Then do the “star” (yellow pepper) & “garlands” (red pepper slices), & fit everything else around that. Don’t feel bound to the veggies I chose; go with what you love!

5 Comments

Filed under Holidays, Recipes

Festive (& easy!) headbands for the holidays.

This is the first crafty thing I’ve made in months. Please at least act surprised. But it was easy, inexpensive, & turned out beautifully!

I was inspired by this holly headband I found on Pinterest, but alas, not having green felt or her super-spiffy handheld sewing machine (or any sewing machine!), I decided to use some candy-cane-striped ribbon I had on hand from last year to make these beautiful peppermint roses.

My friend Tamara had just taught me a few months ago how to make these kinds of fabric roses, & trust me, they are SO easy. If I can do it, you can. I promise. Plus, I even remembered to take pictures to have a photo tutorial for you! (You can act surprised again.)

What you need for your holiday headband:

  • a headband (this perfect red sparkly girl-sized one came in a pack of 5 different colors by Goody for less than $5 at CVS, or for girls with less hair, you could use elastic or make the roses small & do a clippie instead)
  • several feet of 2-inch-wide holiday ribbon, wire removed, or fabric
  • glue gun
  • some felt
  • scissors

How to make it:

  1. Take some of your ribbon (no need to be exact… the large rose was almost my armspan; the small one, maybe a little over a foot) & tie a single knot an inch or two from one end. The knot is your rose’s center & the extra inch or two will serve as sort of a “handle” to give you as few glue gun blisters as possible while making your rose.
  2. Hold your “handle” in your non-dominant hand. With your other hand, fold your ribbon in half lengthwise (make sure the pretty side is out, of course) & start to twist it. You’ll keep twisting as you go.
  3. Dab some hot glue on one side of your knot & very carefully wrap the twisted ribbon around it. Keep going around in a circle, dabbing hot glue every quarter-turn or so, so it becomes a spiral.
  4. Continue until you either are almost out of ribbon or feel your rose is big enough. Make an extra-good dab of hot glue for your last one, leaving an inch or two. You should have 2 end bits sticking out the back now.
  5. Cut off your “handle” as close to the knot as you can without injuring anything.
  6. Twist the end bit behind & secure with some more glue.
  7. Repeat until you have as many roses as you want in the sizes you want (try to make them all slightly different sizes).
  8. Now cut some felt circles to be just smaller than your roses. You want it to give the whole rose some structure & stiffness, but you don’t want it to be visible from the front. Glue them to the back of each rose.
  9. Arrange the roses how you want & dab glue on the outsides of the roses to secure them where they join. Then figure out where you want them on your headband (beginning an inch & a half to two inches above the top of the ear is usually your best bet) & put a line of hot glue on the headband, then stick it to the backs to your roses.
  10. Cut a strip of felt a half inch or more wider than your headband that will still be invisible from the front but also touch all of your roses (the example below is a little sparse on the coverage of the small rose on the right). This strip of felt is what keeps everything together, so glue it on WELL. I started with a line of glue along the headband, then securing with another line of glue to the left & one to the right.
  11. Let her show it off at your next holiday party! Maybe even make one for yourself to match!


I'm Lovin' It at TidyMom

Get Your Craft On Tuesdays

4 Comments

Filed under Crafts, Holidays, Tutorials

{Secret Recipe Club} Big Soft Ginger Cookies

I’m so excited to be a new member of the Secret Recipe Club! To be honest, Amanda accepted me last month, but I was still feeling so nauseous that she gave me a pass. But I’m so glad I got to participate this month, because let me tell you, these cookies are goooood.

They are Country Woman magazine’s Big Soft Ginger Cookies, & they come from No Reason Needed. The Munchkin devoured them — so did we — & one of the missionaries we had over for dinner mentioned that they made him feel like home: his mom makes them all the time & he loves dipping them in milk.

To me, ginger cookies just feel cozy, like the holidays. So what better time to make them than while your husband’s at Target buying you (okay, himself too) the Michael Buble Christmas album?

I didn’t need to change anything in the recipe for them to turn out perfect. I just rewrote the step order for you below so you dirty fewer measuring cups.

  • 2 1/4 cups all-purpose flour
  • 1 tsp. baking soda
  • 1/4 tsp. salt
  • 2 tsp. ground ginger
  • 3/4 tsp. cinnamon
  • 1/2 tsp. ground cloves
  • 3/4 cup butter, softened
  • 1 cup granulated sugar
  • 1 egg
  • 1/4 cup molasses
  • additional sugar (sanding sugar would be great) for rolling
  1. Preheat oven to 350. Line cookie sheets with parchment. In a medium bowl, combine dry ingredients. Set aside.
  2. In a large bowl with an electric mixer, cream together butter & sugar until fluffy. Scrape sides of bowl. Beat in egg & molasses.
  3. With the mixer on low, gradually mix in the flour mixture until well combined.
  4. With clean, slightly damp hands (this was the only way I could keep half the dough from sticking to them), roll dough into 1- to 1.5-inch balls, then roll in sugar. Place a few inches apart on the prepared cookie sheets, then flatten with your palm.
  5. Bake 8-10 minutes or until just beginning to brown around the edges.
  6. Cool on cookie sheet for a few minutes, then remove to wire racks to cool completely. (Though I must say they are deeelicious warm & gooey straight out of the oven!)

Thanks again to No Reason Needed for such a tasty treat!

Secret Recipe Club 

12 Comments

Filed under Holidays, Recipes

There’s always money in the banana stand… (wink wink)

These frozen bananas bring back memories of Balboa Island bananas. Not so frozen you can’t bite into them (like the ones at Disneyland), but still cold & delicious on a hot summer day! The best part about this one is that your kids can dip their own!

Please allow me to explain the use of the Christmas sprinkles.

You see, I followed my own advice & invited some new friends over for dinner Sunday night. I had dinner enough for 4 adults & a Munchkin, but had no idea what to do for dessert. The movers neglected until the last minute to tell us they wouldn’t move food items, so we’ve been slowly restocking baking staples since we’ve been here, & after the previous day’s cobbler I didn’t have much left! Plus, my oven is still refusing to decide how much cooler than real life it actually wants to be, so baking was definitely out of the question.

I was having quite a quandary (like the alliteration there?) when I was going through my Google Reader & saw this great idea over at Talkin’ Chow Playin’ House! Saved! I had bananas, chocolate chips, & some white candy melts I smuggled down from the old apartment. Perfect! But what to decorate them with? I had some sliced almonds… Wait! I’d smuggled Christmas sprinkles too! & only Christmas sprinkles, apparently. So there you go. Christmas frozen bananas. In July. Hey, we’re in Florida, aren’t we? Isn’t it always like 90 degrees on Christmas here?

  1. Cut ripe (but not too ripe) bananas in half, one half for each person.
  2. Use really sharp scissors or wirecutters to snip the pointy ends off of your skewers (one for each half banana), then cut them in half. Poke two into the bottom of each banana half & lay them on parchment paper on a cookie sheet, plate, etc.
  3. Freeze for at least an hour. We ate ours after an hour & a half or so & they were still quite biteable!
  4. Put your chocolate chips in a microwave-safe dish. Add a little oil. (If using candy melts, omit the oil.) Microwave a minute or so & stir until smooth.
  5. Let everyone roll/dip/drizzle their banana in the chocolate & decorate as desired. It doesn’t have to look great (see above) — just taste delicious.
  6. Enjoy!

P.S. If you recognized the quote in the post title, let’s just say My Husband The Recovering Arrested Development Fan & his college roommates would salute you.

Tidy Mom

Join  us Saturdays at tatertotsandjello.com for the weekend wrap   up           party!

5 Comments

Filed under Holidays, Recipes