Tag Archives: pizza

My favorite pizza.

Nut-free | Soy-free | Gluten-free option | Clean eating option
IMG_0408

We’re big pizza lovers in this house. Back in my semi-homemade days I had several pizza posts, but they were all boring pepperoni (or pepperoni and green peppers) pizza. Then we lived in Switzerland and spent 10 days in Italy. They don’t do pepperoni. They do salami, but trust me, it is NOT the same. So I got a little more adventurous.

In the 4 weeks between when we were told we were moving to Switzerland for 6 months and when we actually moved, I binge-watched Rick Steeves’ Europe on PBS–only the countries we were actually thinking of going to (sorry Estonia)–and learned, among many other things, the reported origin of our beloved pizza. It came from Naples in the early 18th or 19th centuries. Legend has it that the archetypal pizza, Pizza Margherita, was commissioned in 1889 to honor the visiting Queen Margherita with the three colors of the Italian flag: red tomatoes, green basil, and white mozzarella.

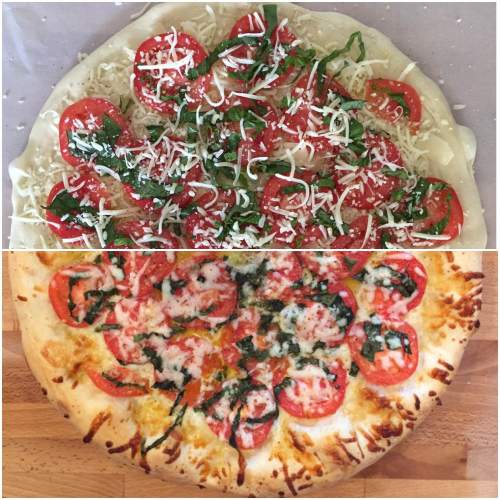
I ate this pizza a lot in Italy. And Switzerland. And interestingly, everyone does it differently. The Swiss just do it with tomato sauce. The Romans did a little sauce AND tomatoes. We never made it to Naples, so I don’t know if this really is the real way, but by far my favorite way of eating Pizza Margherita is this: garlic-infused olive oil (LOTS of garlic), fresh Roma tomatoes, mozzarella, Parmesan for a little bite, and lots of basil.

Publix, our local amazing grocery chain, has amazing Italian-style pizza dough for just a couple bucks, so I get two: I make one pepperoni for the girls, and my husband and I share this. And I eat the leftovers for lunch the next day.

No, this is not clean. This is not healthy. You can use whole-grain or gluten-free crust, and the veggies and part-skim mozzarella make it less terrible for you than delivery (or diGiorno! Ha!), but let’s keep this in the “sometimes food” category. With the chocolate frozen custard. Yum!

Pizza Margherita

Original recipe here

  • Pizza dough of choice
  • 1/4 cup extra-virgin olive oil
  • 1 Tbsp minced garlic (about 3-4 cloves)
  • 3 Roma tomatoes, thinly sliced
  • 1/2 tsp Kosher salt
  • 2 cups shredded mozzarella
  • 1/2 cup shredded Parmesan
  • 10 basil leaves, chopped
  • salt and pepper, to taste
  1. Preheat oven to 400 or 425, depending on the instructions for your chosen pizza dough, with a pizza stone in the oven (optional but highly recommended).
  2. Pour olive oil into a medium bowl and add garlic and salt. Add sliced tomatoes; toss to coat, and marinate 10-15 minutes at room temperature.
  3. Roll out and toss your pizza dough to desired width and thickness on a large piece of parchment paper.
  4. Brush dough evenly with about a tablespoon of garlic oil marinade. Sprinkle evenly with 1 1/2 cups of the mozzarella and all of the Parmesan.
  5. Top with tomato slices, spaced evenly, and sprinkle basil over the tomatoes.
  6. Sprinkle remaining mozzarella evenly over the top of the basil and season all over with salt and pepper.
  7. Bake 15-20 minutes, until crust is golden, and let stand 5 minutes before slicing.
  8. Enjoy!
  9. If there are leftovers, reheat in a 350-degree oven–not the microwave.

Leave a comment

Filed under Recipes

Baking Birthday Party!

Congratulations to “semicrunchymomma,” who wins the Estelle headband from Guavaloo for her little girl! Thanks to all who liked & shared!

birthday girl

This darling girl turned 4 this summer, & she told me back in JANUARY (she plans ahead like her mama) that she wanted a “baking party, with cupcakes & pizzas & chef hats.” What fun!

dessert table

I had a field day with my cricut’s cupcake font for the “happy birthday” banner & these fun chandelier hangings my husband suggested:

chandelier

I also used the cricut to freezer-paper stencil custom “Chef [name]” aprons for each of the kids. Kid-sized apron & chef hat sets were around $5 each from Chefskin on Amazon. I kept the party small–8 kids total–to keep cost & chaos to a minimum.

This fun garland was just cupcake papers of different sizes & colors randomly threaded onto embroidery thread with an embroidery needle!

cupcake paper garland

While we waited for everyone to arrive, the chefs colored their very own restaurant menus…

menu 1menu 2

…drawn by the very talented Sister Alison Bowe, a missionary currently serving in our ward! (I enlarged them to 11×17 for the kids.)

menu 3As the menus said, once the kids were all there & dressed as chefs, they got to make pizzas. Our local Grimaldi’s donated the dough, & “Chef Dad” tossed it pizzeria-style before the kids “decorated” them, in the birthday girl’s words.

pizza
Tasty!
pizza 2Then they made fruit, yogurt, & granola parfaits. So that not ALL of the party food was junk.

parfait makingFinally, the part everyone was waiting for: decorating cookies & cupcakes! With like 6 different colors of frosting & more than a dozen kinds of sprinkles, what could go wrong?

cupcakes and decorationscookiesTurns out, not a whole lot. Luckily all of the parents stuck around to help out, which minimized the mess, & the kids took their decorating very seriously!

decoratingdecorating 2The birthday girl loved that she got to decorate her own birthday cupcake!

candles(I used this beet red velvet cupcake recipe. Had to counteract all that sugar somehow, right? See what a conscientious party host I am?)

Each kid got to decorate 4 cookies & 2 cupcakes. They ate 1 of each at the party, & the rest went home in these cute treat boxes from Michael’s, finished with baker’s twine & a darling tag.

favor boxWhat a fun time we all had! Special thanks to Ursula Borrack for capturing such sweet photos of this sweet party!

Shared at Tater Tots & Jello

3 Comments

Filed under Activities, Crafts

Witch (or Wizard) Hat Calzones.

It’s Halloween. The kids are so excited for trick-or-treating they don’t want to eat dinner. So they pick at their food & then wind up getting sick from too much candy on an empty stomach. That was a lot of our Halloweens growing up. Fortunately, I have a solution. Meet our most favorite Halloween meal ever:

These calzones are so fun & tasty — the kids get to decorate their own! — that they’ll finally eat dinner on Halloween!

I first found these at BHG, then made the filling tastier & more substantial for eating as an entree instead of an appetizer. 1 calzone would be good for a little kid, while big kids & adults will probably need 2 to keep their strength up for an entire evening of trick-or-treating. These could also be great as “Sorting Hats” for a Harry Potter party.

  • 3.5-oz. pkg. pepperoni slices*
  • 2 oz. cream cheese, softened
  • 1/4 cup parmesan
  • 1/4 cup shredded mozzarella
  • 2 pkgs. (8 oz. each) crescent roll dough
  • 1 egg, slightly beaten
  • decorations like olives, capers, bell pepper, parmesan, red pepper flakes, Italian seasoning, etc.
  • pizza sauce, warmed, for dipping

* You can make these vegetarian by using about 3 oz. of very finely diced quick-cooking veggies like peppers & onions.

  1. Preheat your oven to 425 & grease 2 cookie sheets.
  2. Reserve a few slices of pepperoni to cut into shapes for decorations. A sharp paring knife & a few minutes can yield everything from simple triangles (cut a pepperoni slice like a pizza) to stars (cut 5 triangles out of a slice) & even jack-o-lanterns (uhhh… just use your head). You can do this with bell pepper as well if you’re going the vegetarian route.
  3. Then chop up the remaining slices finely.
  4. In a small bowl combine the pepperoni with the cream cheese, parmesan, & mozzarella. Use the back of the spoon to “smoosh” it together to form one mass that sticks together. This will be your filling.
  5. Carefully unroll a package of crescent roll dough & separate into triangles. Place them on your prepared baking sheets. Place a tablespoonful of dough into the center of each triangle & try to spread it out just a little so it’s not just one big lump, but stay at least a 1/2 inch away from the edges of the triangle, & even further than that from the short edge, if you can. (See the triangle on the right, below.)
  6. Then carefully unroll the other package of crescent roll dough & separate into triangles. Add a little water to your beaten egg & brush the mixture around the edges of each triangle & carefully lay a new triangle on each prepared triangle (see above). Be sure to seal the edges with your fingers.
  7. Brush the bottom (short) edge of each triangle with more of the egg mixture & fold/roll it up to form a brim for your hat. Then tweak the top of each hat to make it more crooked & spooky. (Basically I just kind of bend them into a bit of a squiggle.)
  8. Finally, brush the whole thing with more egg & let your ghouls & goblins decorate their hats however they’d like. Bake for 7-9 minutes or until golden & serve with pizza sauce.

works for me wednesday at we are that family

Cast Party Wednesday

36th Avenue

Passionately Artistic

Pin’Inspirational Thursdays

8 Comments

Filed under Holidays, Recipes

Token “Mommy Blog” post.

Every mom thinks they have the cutest kids in the world. But I will tell you, in all honesty, that I have that one wrapped up.

Just listen to how she says the word “monkey,” or watch how she scrunches up her eyes & nose to say “cheese” for the camera, or chuckle at how she runs everywhere are on her tiptoes, or let her hold so tight to your index finger as you walk through the subway together.

Yep, my Munchkin is the cutest in the land.

Happy Saturday, everyone! I hope you & your Munchkins have great plans for today! Ours involve a “choo-choo,” cupcakes (Magnolia!!!), a visit from old friends, & Grimaldi’s pizza. It’s going to be a great afternoon! Oh, & watching some Cougar basketball tonight! Go Cougs!

1 Comment

Filed under Adventures in Mommydom

St. Patty’s Day dinner: I {shamrock} pizza.

Missive alert…

I’m going to admit something to you: I’m kind of embarrassed to post this next idea. I bought the dough for this pizza two days before I was going to be able to make it, so when I set about kneading & working the dough, it was about as pliable & stretchable as the Play Doh they only recently retired in our church’s Nursery. As a result, the finished pizza doesn’t look pretty. Like, REALLY not pretty. Don’t say I didn’t warn you.

My first thought was to just delete the pictures altogether; this doesn’t belong on the World Wide Web alongside all of these professional-quality photographs of delicious, beautiful food, does it? But then I was emboldened by a great post by the Reluctant Entertainer that I’d read last week. In it, Sandy relates a conversation she had with a food blogger who “does it all” by sending her kids to school, cooking & taking pictures in the afternoon, then shoving her beautiful food in the fridge, where it might get eaten later… or it might get tossed out.

Is this what our lives have come to? Not mine. For one thing, I don’t have the money to toss food out!

I’m not a food photographer, professional party planner, or classically trained chef. I’m just a mom with a rambunctious toddler, a love of cooking, a few ideas in my head, & a grand total of 10 square feet of natural light (& that for only about 3-4 hours on a sunny day… hence the exceedingly unflattering use of the flash for most everything). When I started this blog, it was to share my “just-mom” ideas with other “just-moms” out there. The pictures aren’t great. The food doesn’t look like it belongs in a magazine. But the ideas are there for you to share with love with your families, just as I do with mine.

Okay, disclaimer/missive over. (Would I refer to that as a dis-missive?)

Now for the fun stuff: How to turn a bell pepper into 4-leaf clovers for your St. Patrick’s Day pizza.

You probably already know about our love affair with pizza. So it should be no surprise that I came up with an excuse to eat it on yet another holiday. I honestly can’t remember how this idea came about — whether I read it somewhere or just had an epiphany — but regardless, it worked a lot better the first time I tried it, with a Papa Murphy’s pizza with a mercifully large, flat crust. So there you go, for what that’s worth.

When you go to the grocery store, look for a green bell pepper with 4 relatively equal-sized lobes:

Cut 1/4-inch slices across the width of the pepper from the bottom up, cutting out any of the seedy core as you come to it. These are your “shamrocks.” When you get close to the top, just cut short slices around the core. These will be your “stems.”

Now for the pizza part: Preheat your oven & pizza stone to 450. Then roll out your crust on your parchment paper (with a little flour if it needs it) & top it with the sauce & any other non-shamrock toppings you’re planning on using.

Then cover those with your cheese. (The store was out of regular shredded, so I had to go with finely shredded. Can someone give me a concrete reason they even created this stuff? It just gets everywhere except where you want it to stay!)

Now arrange your shamrocks & stems however they’ll fit & look pretty. A larger-than-13-inch pizza will provide more breathing room, so people will have an easier time telling what it is.

Now bake it until the cheese is bubbly & the crust is golden-brown. Then enjoy!

What are you making for St. Patty’s Day dinner?

3 Comments

Filed under Holidays, Recipes

I heart pizza.

We love pizza. If I don’t feel like cooking & I ask my husband what he wants to get for dinner, 95% of the time it’ll be pizza. Give The Munchkin a choice, & she’ll say either “pizza” or “pancakes.” About once a week, we make pizza bagels for lunch. We love pizza. My husband prefers Chicago-style, but living here is giving him an appreciation for the finer points of my favorite, New York-style pizza. I won’t give you a run-down of my favorite pizza places on both sides of the Hudson (unless you ask, & then I’ll be more than happy to oblige) because today we’re talking about heart-shaped pizza. You know, the kind you make yourself.

What? No delivery? Not even DiGiornio?

Heart-shaped pizza has a special place in my heart because when my husband & I were dating at BYU, he took me to the pizza place in Provo, The Brick Oven, for Valentine’s Day. On the menu? Heart-shaped pizza. Then he took me to my first BYU Cougar Basketball game. Then we said “I love you” for the first time. (This is where you say, “Awwwww…”) So a few weeks ago, to celebrate the 6th anniversary of the blind date where we met, I made us a heart-shaped pizza. Just like old times.

I bought some dough for $1.95 at a bakery here in town. But you could make your own. I spread it out into a heart shape (took way longer than expected) onto some parchment paper & covered it with sauce. I prefer the Contadina sauce in the squeeze bottle because it tastes the most homemade & is super easy to spread evenly. But again, you could make your own.

Then I scattered part-skim mozzarella cheese all over it. You know, because we’re being heart-healthy here on our heart-shaped pizza.

Then I put on the topping we had: mini pepperonis. Don’t judge. After that I slid the pizza, parchment paper & all, onto the pizza stone I’d had heating up in our 450-degree oven. The parchment paper eliminates the need for cornmeal or one of those nifty pizza paddles (I wonder what the technical term is) you see at pizza parlors. The stone helps the pizza bake evenly without burning. But, as you can see, it doesn’t guarantee against ridiculous bubbling.

This could be part of a fun family Valentine’s Day dinner (since it’s a weeknight, & let’s be serious: what parents are going to have time to go out to dinner on actual Valentine’s Day this year?) that everyone can help with.

What’s on your weeknight Valentine’s Day menu this year?

1 Comment

Filed under Holidays, Recipes