Monthly Archives: July 2011

There’s always money in the banana stand… (wink wink)

These frozen bananas bring back memories of Balboa Island bananas. Not so frozen you can’t bite into them (like the ones at Disneyland), but still cold & delicious on a hot summer day! The best part about this one is that your kids can dip their own!

Please allow me to explain the use of the Christmas sprinkles.

You see, I followed my own advice & invited some new friends over for dinner Sunday night. I had dinner enough for 4 adults & a Munchkin, but had no idea what to do for dessert. The movers neglected until the last minute to tell us they wouldn’t move food items, so we’ve been slowly restocking baking staples since we’ve been here, & after the previous day’s cobbler I didn’t have much left! Plus, my oven is still refusing to decide how much cooler than real life it actually wants to be, so baking was definitely out of the question.

I was having quite a quandary (like the alliteration there?) when I was going through my Google Reader & saw this great idea over at Talkin’ Chow Playin’ House! Saved! I had bananas, chocolate chips, & some white candy melts I smuggled down from the old apartment. Perfect! But what to decorate them with? I had some sliced almonds… Wait! I’d smuggled Christmas sprinkles too! & only Christmas sprinkles, apparently. So there you go. Christmas frozen bananas. In July. Hey, we’re in Florida, aren’t we? Isn’t it always like 90 degrees on Christmas here?

  1. Cut ripe (but not too ripe) bananas in half, one half for each person.
  2. Use really sharp scissors or wirecutters to snip the pointy ends off of your skewers (one for each half banana), then cut them in half. Poke two into the bottom of each banana half & lay them on parchment paper on a cookie sheet, plate, etc.
  3. Freeze for at least an hour. We ate ours after an hour & a half or so & they were still quite biteable!
  4. Put your chocolate chips in a microwave-safe dish. Add a little oil. (If using candy melts, omit the oil.) Microwave a minute or so & stir until smooth.
  5. Let everyone roll/dip/drizzle their banana in the chocolate & decorate as desired. It doesn’t have to look great (see above) — just taste delicious.
  6. Enjoy!

P.S. If you recognized the quote in the post title, let’s just say My Husband The Recovering Arrested Development Fan & his college roommates would salute you.

Tidy Mom

Join  us Saturdays at tatertotsandjello.com for the weekend wrap   up           party!

5 Comments

Filed under Holidays, Recipes

Preparing your child for a move. (Part 2 of 2: Settling in.)

We’ve been here a week now & only have a few (granted, giant) boxes left to unpack! Hooray! It feels a lot better than where we were 3 weeks ago. Or even a week & a half ago:

Yikes!

Now that we really are settling in, I thought now would be a good time to post part 2 of my “preparing your child for a move” series. Part 1, before the move, is right here.

The Munchkin playing in the boxes before the move... Recognize the beer boxes I talked about in the last post?

Here some ideas about how to help your kids adjust to your new home & neighborhood:

  • When you & your stuff first get to your new place, let your child help unpack & decide where something should go in her room. This can give her a sense of control when things are crazy.
  • Set your kids’ rooms up (the furniture, at least) right away. Especially if you’ve been driving a few days, it’ll feel good to be reunited with your stuff. Plus, sleeping in a new, big, empty room is creepy.
  • Try to get pictures back up on the walls again as soon as possible to make it start feeling like home.
  • As you unpack, talk about what’s better about your new place: “There are so many shelves in your new room for all of your toys!” etc. (The Munchkin’s new room is so cavernous we need two nightlights just to see at night! Whereas ours is barely big enough for our bed & dressers. How is that fair?)
  • Even though things are hectic, try to get involved in your new community as quickly as possible to make new friends. Congregations in The Church of Jesus Christ of Latter-day Saints, known as wards, are organized geographically. So as soon as we knew our new address, we were able to find out which ward we would belong to! If you’re not LDS, find a church or temple to attend. Involve your children in lessons, Gymboree, or after-school groups to meet the other parents & help your kids make friends.
  • Speaking of making friends, teach your child how to introduce herself to new people.
  • Just like before you moved, try to take a little while off from unpacking to give your children attention. Take an hour or two to drive around your new town. Find a new neighborhood pizza place to call “yours” (we just found ours!). Locate the library & get a library card. Go play on the playground nearby!
  • Once you get more settled in, if you feel up to it, hold a housewarming party & invite people from your new community!
  • Even with all the craziness, try to stick to naptime & bedtime routines as much as you can. With everything else changing, it’s helpful to have a familiar routine to hold onto.
  • Understand that certain milestones like potty training & sleeping through the night may regress or suffer setbacks for a little while during this transition. Your kids might start acting out a little more than usual (ours sure did) too. It’s normal.
  • Lastly & most importantly, emphasize that no matter where you live, your family will be together, & that’s what matters!

works for me wednesday at we are that family


2 Comments

Filed under Activities, Adventures in Mommydom

Award-winning (!!!) peach-strawberry cobbler.

Yesterday was Pioneer Day, a holiday that commemorates the day in 1847 when the Mormon pioneers first entered the Salt Lake Valley. It’s a state holiday in Utah; everywhere else, Mormon wards put on picnics/barbecues/etc. to celebrate. Our new ward had a barbecue & “Dutch oven” baking contest on Saturday. (“Dutch oven” is in quotes because entrants were instructed to bake it in their ovens at home, then bring it in a Dutch oven. I used my Le Creuset Dutch oven. It still counts.)

Meet: the winner! Ta-da!

This recipe originated from The Princess & the Frog: Tiana’s Cookbook: Recipes for Kids, was modified by Tina at Mom’s Crazy Cooking, & then re-modified by me & my unfortunately still wonky (that Indiana-ism is the only word I can think of that can accurately describe it) oven.

  • 1/2 cup butter
  • 3 cups diced fresh peaches (I wound up having to freeze half of mine because produce gets to the store a little riper down here than in the Tri-State Area; they still worked fine)
  • 1 cup sliced fresh strawberries (ditto)
  • 1 cup sugar, divided
  • 1 cup flour
  • 2 tsp. baking powder
  • pinch salt
  • 1 cup cold milk (I used 2%)
  • 1 tsp. vanilla
  1. Preheat your oven to 350 (or prepare your campfire, if you’re ambitious enough to be all “authentic”). Use a pat of the butter to grease the inside of your Dutch oven.
  2. Melt remaining butter in the microwave. Set aside.
  3. Combine fruit in a small-ish bowl & sprinkle with 1 Tbsp. of the sugar. Stir gently & then set aside to macerate.
  4. In a medium bowl, whisk together flour, baking powder, & salt. Add remaining sugar, milk, & vanilla; stir until well blended. The batter will be (perhaps alarmingly) thin.
  5. Pour the melted butter into the batter & whisk quickly until just combined. The batter should be a little thicker now. Pour immediately into the bottom of your Dutch oven.
  6. Gently spoon the fruit mixture into the batter & lightly press it partway into the batter.
  7. Bake (uncovered if you’re using the oven; covered if you’re using a campfire) about 1 hour, or until top is golden brown. Serve warm. Win a baking contest!

8 Comments

Filed under Holidays, Recipes

Indoor S’mores.

I’m in gas-oven withdrawal. The stove/oven in our new place is electric, & I’m having a hard time with the whole “patience” thing when it comes to getting water to boil. Plus, the barbecue chicken I made for dinner tonight was pretty much raw. Joy. So I’m in the process of making my first batch of chocolate-chip cookies in the new oven to try to calibrate the darn thing. Please let it be something simple, like being a few degrees off or something.

In the meantime, here’s another “recipe” from before we moved. That word is in quotes because it’s really not a recipe — just a housewife desperate for something sweet to eat after The Munchkin’s in bed that doesn’t involve getting dishes dirty & that helps polish off some of the stuff in her pantry before moving.

Let’s make S’mores! Without the campfire!

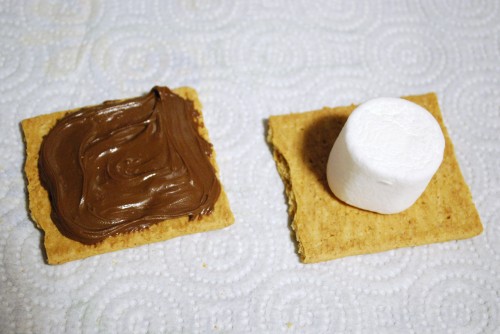
All you need is a graham cracker, a marshmallow, & some glorious Nutella. Sliced bananas would also be spot-on — but we didn’t have any. Give it a try though; I promise you’ll love it.

On a paper towel, of course, because we’re trying not to get dishes dirty, remember? Except for the knife we used to spread the Nutella, which our hypothetical housewife immediately licked clean enough to eat off of anyway… Hypothetically.

Now we take the marshmallow half & nuke it for 10 seconds — just until it puffs up. Any longer than that & it’ll blow up & you’ll spend the next hour scraping hardened marshmallow off of the inside of your microwave. (Childhood experience with Peeps informed that little tidbit…)

If you’re daring enough to get a cookie sheet dirty, putting this baby under the broiler in you oven would give it that delicious, campfire-esque toastiness you might be looking for.

Lastly, just smush the two halves together! The Nutella makes it even meltier & oozier than a Hershey’s chocolate bar. You can thank me later.

Now, who can help me relearn how to cook in an electric oven??? So far it looks like it might be as much as 25 degrees lower than it says. Help!

Tidy Mom

Join  us Saturdays at tatertotsandjello.com for the weekend wrap   up           party!

7 Comments

Filed under Recipes

Slow-cooker fajitas.

We’re back online! It feels so good to have Internet again. We’re still getting settled in, & I’m having a hard time finding places to fit everything inside my tiny kitchen (I may or may not be keeping my spices in a cardboard box for the moment & some of my baking dishes in a linen closet; how ironic that our NJ kitchen was larger!), so no kitchen or craft experimentation just yet, but I do have one recipe that I photographed in our old kitchen & didn’t have time to post before we rushed down here.

When The Munchkin was tiny, she was really tiny. Nursing was a two-handed job just because she was so small, so my long list of books to read while nursing turned into countless hours of DVR’d movies & TV shows in the middle of the night. I barely left the living room sofa. My daytime lineup included several cooking shows, like Semi-Homemade with Sandra Lee. This recipe is adapted from one of hers. In addition to being wonderfully easy, this is a great recipe for picky eaters who have a hard time with texture; the veggies get nice & soft in the slow cooker.

Slow-Cooker Fajitas

  •  2 lbs. beef round steak, sliced thin (I just buy the pre-sliced stir-fry beef)
  • 2 pkts. fajita seasoning
  • 1 onion, thinly sliced
  • 2 green peppers, sliced 1/2 inch thick
  • 1 red bell pepper, sliced 1/2 inch thick
  • 1/2 cup plus a splash of apple juice
  • whole-wheat tortillas
  • sour cream, cheese, etc., for serving

(I make a half recipe for us, so that’s why one of the peppers is missing.)

To slice your peppers without getting the seeds everywhere, use Ina Garten’s method (which I also learned from my nursing days in front of the TV): Hold your pepper with the stem up on your cutting board, then cut around the core using a large chef’s knife. Discard the core, seeds, & all, when you’re done. No mess!

  1. Add sliced veggies to the slow cooker; toss with 1 packet of seasoning.
  2. Add steak slices on top, seasoning those with the other packet as you go to make sure that the beef is relatively evenly coated. I don’t use the whole packet; it’s plenty seasoned with less. But you can choose how much to put on.
  3. Pour the apple juice over the top.
  4. Cook on low 8-10 hours.
  5. To serve, warm tortillas in the microwave, then use metal tongs or a slotted spoon to add meat & veggies. Top with sour cream, cheese, & whatever else sounds tasty!

works for me wednesday at we are that family
Cast Party Wednesday

36th Avenue

8 Comments

Filed under Recipes

Potstickers

Hi all! We made it safe & sound to our new apartment on Friday night & our stuff followed Saturday, but we won’t have Internet until Wednesday. Thankfully, my awesome sister-in-law Lisa is back posting another delicious recipe in my absence! Take it away, Lisa!

I am from the throw-it-in-the-pot-and-hope-for-the-best school of cooking. I look at most recipes as guidelines, and don’t particularly worry about the end result being perfect.

Potstickers are perfect for experimenting. There are only a few steps to actually make them. First, make a filling. Second, spoon the filling onto the wrappers. Third, fold and seal the wrappers. Fourth, cook and eat! This process is time consuming, so that is why I usually make a large batch and work with a friend.

So, for the filling, your options are endless. I prefer pork, while you could use chicken, tofu, or whatever you prefer. If you use meat, be sure to get it ground so it is easier to mix with the other ingredients. We added shredded cabbage, carrot, and green onions. You will also need a binder to help it all stick together. In this recipe, we used about a teaspoon of sugar and about 2 tablespoons each of soy sauce and warm water mixed together. I have also used sesame oil with a dash of chili oil in the past.

Filling ready to go.

Make sure not to put too much filling in the wonton wrappers. They won’t seal and when you cook them, the filling will come out into the pan. Generally, less than 1 teaspoon of filling is a good guideline.

Don't use too much filling!

To seal the wrappers, dip your finger into a cup of warm water and wet around the edges. You will need to make a pleat in one side of the wrapper as you seal it to the other half to keep excess air out of the potsticker.

Ready to cook or freeze.

At this point, you have a couple of options. You can cook them all first and then freeze, or you can freeze first and cook later. If you want to cook first, put enough vegetable oil into a pan to just cover the bottom. Heat on medium heat until water dropped in makes the oil spit. Place the potstickers in the oil and brown on three sides. Then add about one-quarter cup of water and put the lid on. Steam for about four to five minutes.

If you would like to freeze the uncooked potstickers, line them up on a cookie sheet or jelly roll pan that has been lined with waxed paper and floured. You can add another layer on top, just be sure to generously dust the first layer with flour before adding an additional piece of waxed paper. Freeze for 1-2 hours and then you can transfer them to a gallon size freezer bag.

Cooking frozen, uncooked potstickers is a little different. You can still cook them in the pan, but don’t steam them or they will just fall apart. I usually finish them in the microwave to be sure the filling is cooked. A deep fryer also works. It takes about 5-7 minutes.

You can use plain soy sauce for dipping, or add a dash of lemon juice for a little kick.

Our recipe used:

1 lb ground pork        1 green cabbage
2-3 carrots                   several green onions
soy sauce                      sugar
water                              2 pkg. wonton wrappers.

This made about 100 potstickers.

I don’t have any pictures of the finished product because we ate them too quickly.

Have fun experimenting!

1 Comment

Filed under Posted by Lisa, Recipes

Top 10 things I’m going to miss about NYC.

I’m late posting today. I also happen to be in Maryland at the moment, on what is quite possibly the slowest Internet connection ever. The movers asked to come a day early (yesterday), & decided at 1pm today that they’d be delivering our stuff in Florida on Saturday, so we left at 4:40pm, just as rush hour traffic was starting to pick up. Fortunately, we made good time, & The Munchkin only got to bed… 2 hours late. Yikes.

Everything happened so fast I honestly haven’t had much time yet to wax sentimental about my favorite city in the world. But I thought I’d post a few of the many things I’ll miss about New York, in no particular order, & that you shouldn’t miss if you come visit.

1.) This view:

2.) The food. Great Italian everywhere, great bakeries everywhere. We’ve been told that “the water’s not right” in Florida for either of those things. Hearing that made me die a little inside. Here are just a few of our favorites: burgers, chocolate, pasta, & pancakes.

3.) Magnolia. Belongs in a class of its own.

4.) Snow! Not limited to NYC, obviously, but I love it in spite of the fact that it often makes walking in the city pretty gross. It’s still fun, & so magical to watch it start falling amid all the lights of the city.

5.) Holidays. Especially Christmas at Macy’s.  From fireworks on the 4th of July to the Macy’s Parade on Thanksgiving, to Easter Egg hunts in the park, the city just knows how to celebrate everything with style & gusto.

6.) There is always free stuff to do! We used the events calendars at Mommy Poppins & Parents Connect (I’m going to be using that second one after our move too; they have dozens of cities on there) to find fun new things to do for free just about every single week! We also love ALL the playgrounds EVERYWHERE! No matter where we went or what we did, there was almost always a great park nearby! (No picture, thanks to Slowest Internet Ever…)

7.) Public transit. Yes, taking the car is often more convenient, especially with more than 1 Munchkin, but it just isn’t as FUN! Trains, subways, ferries (we avoid the buses because we hate traffic) — what’s not to love if you’re a kid? (Also no picture, thanks to Slowest Internet Ever.)

8.) Broadway. We got to go on dates to Mamma Mia! & How to Succeed in Business Without Really Trying with Daniel Radcliffe & John Larroquette. We also saw Phantom & Wicked when we were here on our honeymoon 5 years ago. I’ve been in (well, under — I was in the pit orchestra) lots of musicals, & there is nothing like Broadway!

9.) The “dinosaur bones museum.” This is one of The Munchkin’s favorite places in the world. We got to visit one last time with one of her playgroup friends while the movers were here yesterday. (Slowest Internet Ever won’t let me upload the photo though, so here’s an old one.) We hope she likes the aquarium in Tampa almost as much!

10.) Obviously we’re going to miss the people the absolute most. We’ve made a lot of friends here. This is the first time The Munchkin has been old enough to make any real friendships; she says all her friends’ names almost every day, & she looks forward to church every week so she can see them all at Nursery. We also love how personal the city (& its surrounding environs) can be. Even though it seems big, loud, & scary at first glance, once you really get in there, it’s just such a personable place! We loved walking into the diner or bodega (small market) near our apartment & having the waitresses & checkstand girls greet The Munchkin by name. We loved being greeted by the security guard at the front desk every time we enter or leave the building, & The Munchkin loved getting a cookie at the Italian bakery when we went to get our weekly pizza dough. What a friendly place!

New York really is my favorite city. I love Hoboken too. If you are planning a visit, email me! (See my “About” page for the address.) I’ll send you my guide to “doing” NYC on the cheap with kids & then live vicariously through you as you enjoy the city!

2 Comments

Filed under Adventures in Mommydom

Oven-baked BBQ chicken with corn on the cob.

This is the oven-baked BBQ chicken that will make you say goodbye to your grill forever.

No, not really. But it will have you salivating & saying “mmm” every 3 seconds. &, for my fellow apartment dwellers, it’ll make you feel just the slightest bit less sad about your lack of a grill during the summer.

This recipe gives you the grill marks & smoky taste of the grill with the temperature control of an oven, resulting in a juicier piece of chicken that you actually know is done. What a novel concept! It originally came from here, & the simplicity instantly sold me on it. What didn’t was seasoning it with just salt & pepper. We can do much better than that!

The secret ingredient is this:

Buy it. Use it. Love it.

Oven-baked BBQ Chicken

  •  a little olive oil or PAM spray
  • 2 lbs. bone-in chicken thighs &/or other pieces
  • Smokehouse Rub
  • 1 cup of your favorite barbecue sauce
    1. Preheat the oven to 375. Heat a grill pan on medium-high.
    2. Trim extra fat from chicken & sprinkle both sides with Smokehouse Rub. Spray pan with PAM & sear chicken until browned on both sides, with nice grill marks. Work in batches, if necessary, re-spraying between batches.
    3. When chicken pieces are browned, remove to an ovenproof baking dish.
    4. Pour barbecue sauce over the top, spreading evenly.
    5. Cover with foil & bake 30 minutes or until cooked through. The chicken will be moist, juicy, & swimming in delicious barbecue-y goodness. Serve alongside some yummy corn on the cob (see foolproof method below) for a real summer meal!

 Foolproof Corn on the Cob

First, it helps to buy Indiana corn. It just does. Sweetest, juiciest corn for like 24 cents an ear (or less, if you go to the Farmer’s Market). Anyone else out there know what I’m talking about?

Even if you’re using anemic Jersey corn instead, it can still be delicious. Just boil enough water to cover in a large stockpot & add a generous pinch of sugar. That’s the secret ingredient. Add your corn, then cover & return to a boil for 4-5 minutes. Perfection! Oh, & make sure to use unsalted butter on your sweet corn. You can thank me later.

Get Your Craft On Tuesdays

1 Comment

Filed under Recipes

Strawberry ice cream. 3 ways.

Before we had to put the ice cream maker away for the move, I wanted to make ice cream one last time. Strawberry ice cream, to be exact. The day after I made this decision, Bridget over at Bake at 350 posted a strawberry ice cream recipe! It was meant to be!

I like to eat ice cream in three ways: 1) with a spoon, 2) with a fork, & 3) with my fingers.

But first, we have to start with the ice cream. Which, in this case, apparently comes from the Ben & Jerry’s Ice Cream & Dessert Book. After tasting this, I think I may need to go out & buy it.

  • 2 cups hulled & sliced strawberries
  • 1/3 cup sugar
  • juice of 1/2 a lemon
  • 2 eggs, pasteurized**
  • 3/4 cup sugar
  • 2 cups heavy whipping cream
  • 1 cup whole milk

** If you can’t or don’t want to buy pasteurized eggs — or don’t realize until you’re already halfway into the recipe that it calls for eggs that don’t get cooked, ahem — pasteurize them at home! The eHow.com link I used is now broken, but the gist is to bring the eggs you’ll be using to room temp, then heat a pot of water (enough to cover the eggs) to between 145 & 160 degrees F (use a candy thermometer; I don’t have one, so I used my meat thermometer, which was much less precise & my whites got just the tiniest bit cooked, but still whisked up just fine). Add the eggs to the water, remove from the heat, & let sit for exactly 3 minutes. Then remove the eggs, rinse with cool water, & use them!

  1. In a small bowl, combine the strawberries, 1/3 cup sugar, & lemon juice. Stir just enough to coat, then cover & refrigerate at least an hour.
  2. Mash the strawberries with a potato masher, pastry blender, or even 2 forks; set aside.
  3. In a large bowl, whisk the eggs for 1 to 2 minutes, or until frothy & light. Bemoan the fact that your arm is screaming in protest. Vow to start lifting weights again.
  4. Gradually add the 3/4 cup sugar while still whisking (& arm still protesting); whisk (with your left hand now) for one more minute after it’s all been added.
  5. Stir in the cream & milk. Add the strawberries & stir well.
  6. Add the mixture to the chilled canister of your ice cream maker & follow the manufacturer directions to process it.
  7. Remove from the canister to a freezer-safe container & freeze for a few hours to allow it to harden. But not too much. Unless that’s how you like it. In our family… well, to give you an idea, The Munchkin calls it “ice kweam soup.”

Now. How to serve it?

With a spoon: Scoop some into a dessert dish. Add some blueberries for some fruity, patriotic flair.

With a fork: Serve a scoop alongside a slice of my most favorite lemon-blueberry pound cake. So many delicious summer fruits together on one plate? You can’t say no to that.

With your fingers: Press a small, hard scoop between two soft chocolate-chip cookies. When I was in high school, I used to frequent a shop near UCLA called Diddy Riese, where they made amazing ice cream sandwiches using soft, fresh-baked cookies & enormous scoops of Dreyer’s (Edy’s, for you Easterners) ice cream, for only $1! The price has since gone up to $1.50, but the lines are still around the block, the sandwiches are still scrumptious, & this ice-cream/cookie combo still brings back tasty memories.

What’s your favorite way to eat ice cream? Are you an “ice kweam soup” person too?

Tidy Mom

Join  us Saturdays at tatertotsandjello.com for the weekend wrap   up           party!


10 Comments

Filed under Recipes

Preparing your child for a move. (Part 1 of 2: Before you leave.)

We’re moving. In a week & a half. Yikes!

Since that’s what’s on my mind right now, & since lots of people move during the summer, I thought I’d offer a few tips for helping your kids adjust to moving to a new place. Today I’m posting on how to prepare for the move itself; later I’ll post on how to settle in.

  • Show your kids photos of your new home & new town. Help them find reasons to be excited about the new place. The Munchkin is especially excited to be near the beach.
  • If you are packing yourself, START EARLY. Last year, with a husband taking law school finals, I started packing two months in advance while The Munchkin napped. There’s only so much you can pack that far ahead of time (you’re using everything else too frequently), but it really helps as you get down to the wire. It also helps your 10-month-old skip crawling in favor of cruising, because there are handholds everywhere!
  • Also if you are packing yourself, don’t pay for boxes! I had hoarded diapers.com boxes for months. Any time you get a package, collapse the box right away & stash it in a closet. Another great resource for free packing boxes is liquor stores; just go in & ask for some of their beer boxes. They’re the perfect size & durability for books & other heavy things. The people helping you move in might look at you a little funny though…
  • If your firm is paying for movers, PRAISE HEAVEN. The end.
  • Try to keep pictures up on the walls as long as possible. Even if there are boxes everywhere, having these familiar touches will help keep home feeling like home right up until you move.
  • Moving is a time-consuming process. Even if you’re not having to pack everything yourself, there are still things like getting a place to live, arranging for utilities on both ends, forwarding mail, etc. Kids can feel neglected; take a few minutes every day to just listen to them & give them your undivided attention. Even better, let them choose something special to do to take some time away from moving. This brings me to…
  • Have a “bucket list” of one thing each family member wants to do in your old town before you leave. This will help everyone feel valued (see above) & let all of you “say goodbye.” The Munchkin really wanted to go on the “mewwy-woun.” We’re also planning final visits to Magnolia & Shake Shack.
  • If you have time, throw a goodbye party with friends! Or let a friend throw one for you! That way everyone can say goodbye at once.
  • Speaking of friends, explain to your kids that they won’t get to see their friends all the time anymore. Let them know it’s okay to be sad & miss them, but encourage them by saying that they’ll be able to make new friends in your new town.
  • Explain the moving process to young kids: “A man will pack up your toys & clothes & put them in a big truck (bonus points for showing them the truck if they love trucks) & drive it to our new house! We’re going to drive separately in the car, & our things will meet us there!” {We just had a Family Home Evening about moving, where we talked about Nephi’s family in the Book of Mormon & how they moved to a new place too, & they packed up all of their things as well (see 1 Nephi 18:5-6). After we explained the process, we did the activity below.}
  • Parents magazine just had an article about helping kids adjust to moving, & one thing I thought was a great idea was to let your child decorate her own “treasure box” with stickers to put her favorite things inside. Then take it with you in the car so she isn’t separated from it. Here’s The Munchkin’s treasure box; the first thing she did was put in the 3-inch plastic Woody & Jessie dolls that go with her everywhere lately.
  • MAKE SURE THE LOVEY DOESN’T GET PACKED. IT GOES IN THE CAR. THE END.
  • Lastly, take a minute to say goodbye to your old house. (This was another Parents idea.) During your last meal there, likely on paper plates in your empty house, let each family member say his or her favorite memory of living there. Get your kids excited about making new memories!

Any other tips for moving with kids?

works for me wednesday at we are that family

8 Comments

Filed under Activities, Adventures in Mommydom