Monthly Archives: January 2017

Crock Pot Beef Curry.*

Dairy-free | Soy-free | Nut-free | Gluten-free | Clean eating

img_1680

I put an asterisk by the word “Curry” because it’s not as traditional a curry as I usually make. And if you’ve stuck around here awhile, you know how I am about my curries. BUT – that doesn’t make this dish any less delicious. Kind of like a stew or a ghoulash with a different array of spices. My husband called this, “like my mom’s beef tips, but with curry powder.” So there you go. That’s the best we can describe it. The low, slow cooking tenderizes the stew beef to fork-tender, making this my girls’ new favorite stew.

Slow Cooker Curried Beef Stew

Adapted from here

  • 2 lbs cubed stew beef
  • 1 1/2 lbs petite red or yellow potatoes, quartered
  • 1 cup baby carrots
  • 2 Tbsp yellow curry powder
  • 1 tsp ground cumin
  • 3 cloves garlic, minced
  • 1/2 Tbsp ground ginger
  • 1 tsp salt
  • black pepper, to taste
  • 28-oz can fire-roasted diced tomatoes
  • 1/4 cup coconut milk
  • optional: 2 Tbsp cornstarch, to thicken
  1. Place the beef, potatoes, and carrots in the slow cooker. Add the spices and garlic and toss to coat.
  2. Pour tomatoes and coconut milk over the top, then cover and cook on low 7 hours.
  3. If desired, 20 minutes before serving, stir in cornstarch, then re-cover until ready to serve.
  4. Serve over jasmine rice (or brown rice, for clean eating).

Leave a comment

Filed under Recipes

Awesome salad! (Or rice bowl)

Dairy-free | Soy-free | Gluten-free | Nut-free | Paleo option | Clean eating 

img_1668

I hear it’s winter somewhere. We’ve had highs in the 70s almost every day, so it’s often weird to remember that there’s snow on the ground in literally every other state but ours. For those poor cold souls, here’s a nice shot of summer freshness for you!

With the option to make it a warm, comforting, but still fresh and bright, meal too!

This is another winner from my good friend Jessica. She texted the recipe to me as soon as it was pronounced delicious by her family, and I couldn’t wait to get it on our meal plan! But I knew I’d have to make some kind of modification for my non-salad-eating girls. So here’s what I did: I cooked up a batch of jasmine rice. Yep, that’s all. (I’ll share how I make it extra delicious in a second.)

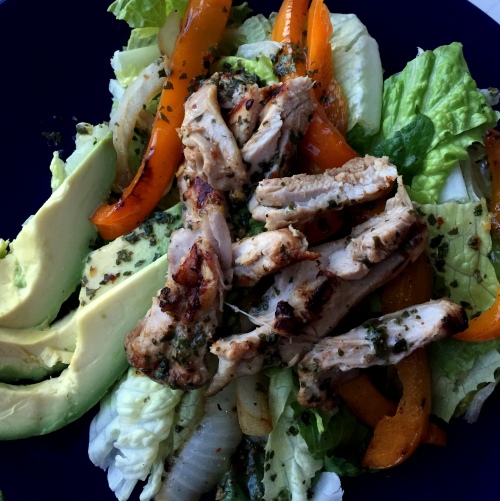
For myself and my husband, I made the salads. The tangy dressing with the delicious marinade, creamy avocado, and peppery bite of the grilled veggies – so good.

But THEN, put the chicken and veggies on top of the savory rice, and the whole flavor profile changes! The marinated chicken takes on a completely different personality! I’m still floored by how versatile this fresh marinade is. (The marinade, which doubles as the dressing, does have chili flakes in it, but it really doesn’t translate to spicy heat, just great zesty flavor.) I can’t wait for leftovers!

Grilled Chili Lime Fajita Salad (or Rice Bowl)

Original recipe here

Marinade/Dressing:

  • 3 Tbsp olive oil
  • 100ml (just over 1/3 cup, or about 4 limes) fresh squeezed lime juice
  • 2 Tbsp fresh chopped cilantro (1 Tbsp dried works just fine)
  • 2 cloves garlic, crushed and rough chopped
  • 1 tsp honey (or brown sugar)
  • 3/4 tsp red chili flakes
  • 1/2 tsp ground cumin
  • 1 tsp salt

Salad:

  • 4 boneless skinless chicken thighs or 3 breasts, or a combo (I haven’t decided which I like better!), no more than 3/4 inch thick
  • 1/2 yellow bell pepper, sliced, and 1/2 red bell pepper, sliced (or if you’re in a pinch like me, just use a whole orange pepper!)
  • 1/2 onion, sliced
  • lettuce leaves
  • avocado, sliced
  • optional: additional cilantro for garnish
  • optional: sour cream, to serve

Rice:

For every cup of dry jasmine rice, add:

  • 2 cups water
  • 1 Tbsp butter or olive oil
  • 1/2 tsp salt
  1. Combine marinade ingredients in a liquid measuring cup and whisk well to emulsify.
  2. Place chicken in a shallow dish; pour half of marinade over chicken. Cover remaining marinade with plastic wrap and save in the fridge to use as salad dressing. Marinate chicken 2 hours or all day.
  3. If making rice, start the rice. Cover and simmer on low 15 minutes, then leave covered until ready to serve.
  4. Heat your grill pan to medium-high and spray with soy-free cooking spray. Grill chicken until done on both sides, with nice grill marks. (I like to cover the pan while the second side cooks so that it heats evenly.) When done, set it aside on a warm plate and cover to rest.
  5. Remove any burned bits from the grill pan, spray again with cooking spray, and add the pepper and onion slices. Grill to desired doneness.
  6. Slice chicken into strips, then build your salad or rice bowl:
    Salad: lettuce, avocado, sliced chicken, and pepper and onion slices. Whisk the dressing again and pour over the salad.
    Rice bowl: rice, sliced chicken, pepper and onion slices, and anything else that sounds good!

2 Comments

Filed under Recipes

Flourless double chocolate peanut butter muffins.

Dairy-free | Soy-free | Gluten-free | Clean eating | Paleo

img_1636

Not much to say about these muffins, except they’re quick, easy, and delicious! Don’t be dubious of the pumpkin – you can’t taste it at all. All it does is make these muffins incredibly moist! (And add a little extra veg to your daily intake…) This recipe yields about 18 muffins, or a dozen each of standard and mini muffins. The cupcake liners are purely optional; as you can see from the photo, the papers were practically falling off of the muffins straight out of the pan, and the mini muffins did just fine without liners of any kind.

Flourless Double Chocolate Peanut Butter Muffins

Adapted from here

  • 2 large eggs, room temp, beaten
  • 2 cups creamy peanut butter
  • 1/2 cup pure maple syrup
  • 1 1/2 cups canned pumpkin
  • 1/2 cup cocoa powder
  • 2 tsp baking soda
  • 2 tsp vanilla extract
  • 1/2 cup Enjoy Life (or other vegan brand) mini chocolate chips
  1. Preheat oven to 350 and spray wells of muffin (or mini muffin) tins with soy-free cooking spray.
  2. Combine all ingredients except the last in a large bowl with a rubber spatula. You’ll have to stir quickly at first to get the peanut butter to incorporate, but soon it’ll all come together. Stir in the chocolate chips.
  3. Use a 1/4 cup (for standard) or 1/8 cup (for mini) triggered ice cream scoop to divide the thick batter into the wells of your muffin tins.
  4. Bake 23-27 minutes or until a toothpick inserted in the center comes out mostly clean. Do not overbake!

2 Comments

Filed under Recipes

Grilled chicken and green beans.

Dairy-free | Soy-free | Nut-free | Gluten-free | Clean eating | Paleo option

img_1629

Lately I’d been finding myself both in a dinner-making rut, and feeling lazy about our clean eating; I wonder if the two are related!

Then one day I found a new recipe for the most delicious-looking and easy green beans. I’m generally not too good at the vegetable side dish thing, to be honest; I try to incorporate the veggies in the dish itself and serve fresh fruit or salad on the side because I want to do as little extra cooking as possible, especially on a weeknight. But these just looked worth it. So I went looking for a good, and easy, chicken recipe to complement it. And I was blown away by the flavor! Usually you need to marinate a chicken breast for hours to get this kind of flavor and tenderness, but here you just brush on a spice rub that took literally 2 minutes to combine! Suffice it to say, this has become one of my favorite weeknight meals. I serve it with brown rice to bulk up the meal, but you can easily omit that, especially if you’re trying to eat paleo or low-carb. I start the green beans first, and as long as the chicken breasts aren’t too thick (tonight mine were), everything finishes at once.

Honey-Dijon Green Beans

Original recipe here

  •  1 lb green beans, washed and ends trimmed
  • 1-2 Tbsp grapeseed or olive oil
  • 1/2 Tbsp honey
  • 1/2 Tbsp organic Dijon mustard
  • coarse Kosher salt
  • pepper
  1. Preheat oven to 425 degrees and line a rimmed baking sheet with parchment.
  2. In a large glass bowl, whisk together oil, honey, and mustard into an emulsion until very well combined.
  3. Add the green beans and use a rubber spatula to coat them thoroughly and evenly with the mustard mixture.
  4. Spread the beans in a single layer on the baking sheet and season with salt and pepper.
  5. Roast for 7 minutes, then remove and carefully flip the beans. Return to the oven for another 6 minutes or until crisped and glazed. (Aren’t they pretty???)

img_1628

Flavorful Grilled Chicken with Spice Rub

Original recipe here

  • 2-3 chicken breasts, halved (make sure they’re less than 3/4 inch thick or they won’t cook evenly)
  • 1 tsp garlic powder
  • 1 tsp ground cumin
  • 1/2 tsp ground coriander
  • 1/2 tsp paprika
  • 1/2 tsp salt
  • 1/4 tsp black pepper
  • 1-2 Tbsp olive oil
  1. In a small bowl, combine the spices and olive oil.
  2. Preheat your grill or grill pan to medium-high heat.
  3. Brush the spice mixture onto both sides of the chicken using a silicone brush or small spatula.
  4. Grill 4-5 minutes to a side until no longer pink in the middle.
  5. Enjoy with green beans and maybe some brown rice!

2 Comments

Filed under Recipes

My favorite bolognese sauce.

Dairy-free | Soy-free | Nut-free | Gluten-free option | Clean eating option

img_1622

Okay, so it’s not the most beautifully lit or composed photo, but I just couldn’t wait another day for good enough light to share this. I love this sauce. I love how fresh and light, yet hearty it is. I love that I can literally get SIX MEALS out of one recipe for my family, thanks to the miracles of freezers and 25-oz Tupperware. And I really just love how it tastes!

One of my very first recipes when I started this blog was a bolognese sauce I loved at the time, but even then I could tell it was missing something. One thing it had that I didn’t want was milk added for richness. This sauce leaves the dairy out and tastes even richer for it. This is our new, current, and hopefully forevermore, favorite. I hope it becomes the same for your family.

Homemade Bolognese Sauce

Original recipe here

  • 1 Tbsp. olive oil
  • 1 large yellow onion, diced and divided
  • 5 cloves garlic, minced
  • 2 lbs. lean (93-95% lean) ground beef or turkey, or a combination
  • 1 red bell pepper, seeded and coarsely chopped
  • 1 can (12 oz) tomato paste
  • 1 tsp. coarse Kosher salt
  • 1 tsp. black pepper
  • 1 Tbsp. dried oregano
  • 1 Tbsp. dried basil
  • 1 1/2 tsp. dried thyme
  • 2 cans (14 oz each) diced tomatoes
  • 2 cans (28 oz each) crushed tomatoes
  • optional: 8 oz. button or baby Bella mushrooms, chopped (I omit this)
  • 1 1/2 cups beef broth
  • 2 Tbsp. brown sugar or coconut sugar
  • optional, if using coconut sugar: 1/2 Tbsp. honey
  • 2 bay leaves
  • 2 Tbsp. good quality Balsamic vinegar
  1. In a very large pot, heat the olive oil over medium heat. Add half of the diced onions and saute until translucent and beginning to brown, 3-4 minutes. Add garlic and continue sauteing, stirring constantly, about 1 minute or until fragrant.
  2. Move the onion mixture to the sides of the pot and add beef and/or turkey. Brown the meat, breaking into small pieces – you may need to increase the heat slightly – and gradually stirring the onion mixture in as the meat browns. Drain excess grease.
  3. In a blender or food processor, puree the remaining onions with the red pepper. Pour the mixture into the pot and stir to incorporate.
  4. Add tomato paste, salt, pepper, oregano, basil, and thyme, and cook 1 minute, stirring to combine.
  5. Add diced and crushed tomatoes, mushrooms if using, broth, and sugar (and honey), stir to incorporate, and then add bay leaves.
  6. Bring to a boil. Reduce to low and simmer, uncovered, 1 hour, stirring occasionally.
  7. Remove from heat, stir in Balsamic vinegar, and let rest 10-15 minutes before serving. (I usually do this while I’m waiting for my pasta to cook.)
  8. Serve over whole-wheat or gluten-free pasta, with Parmesan cheese if desired.
  9. Freeze excess in portioned containers, then pull one out and thaw for an easy weeknight meal! The sauce gets better and better the longer it rests.

Leave a comment

Filed under Recipes

Wurst und Kartoffeln (Brats and Potatoes).

Dairy-free | Soy-free | Nut-free | Clean eating option

fullsizerender-1

Meet one of our favorite meals from our time in Switzerland. It’s easy–one-pot!–it’s dairy-free, and it’s full of great flavor and memories. Over there, they have an entire aisle for varieties of Wurst (sausages), and another whole aisle for mustard, so Stateside we have to try a bit harder to get just the right stuff. Good-quality Dijon mustard, waxy European-style potatoes such as Yukon or Dutch potatoes, and sausages that are as unprocessed as possible, help a lot. Here’s what we’re using (with the addition of Publix Greenwise Dijon):

fullsizerender-2

The girls prefer the Hofmann ones because they remind them of the more hot-dog-like Wienerli, which they like with ketchup. They never really developed a taste for mustard. You can have yours with whatever you like!

Wurst und Kartoffeln

Adapted from here

  • 2-3 Tbsp high-heat oil, such as grapeseed or canola
  • 1 small to medium onion, halved and sliced
  • 2-3 cloves garlic, crushed and roughly chopped
  • 2-3 lbs waxy European-style potatoes (however much will fit in your pan)
  • 2 packages bratwurst of choice (preferably unflavored)
  • salt & pepper to taste
  1. Preheat your oven to 425F (~218C).
  2. Cut your potatoes into bite-sized pieces. I quarter the very small ones; for the larger ones, I cut them into 1/2-inch slices.
  3. In a wide shallow pot on the stove, heat the oil over medium heat. Add the onion and garlic, stirring occasionally, 3-4 minutes, until softened.
  4. Stir in the potatoes, add a little more oil if necessary, and cover for 3-4 minutes. Uncover, stir again, season with salt and pepper, and recover for another 3-4 minutes, until the potatoes have begun to soften.
  5. Place the Wurst on top of the potatoes and put in the oven. img_1546
  6. Bake 30 minutes or until potatoes are fork-tender, turning the sausages halfway through the baking time.
  7. Enjoy!

Leave a comment

Filed under Recipes